Our Blog
Call tracking – The winning edge for lead and sales generation
Shilpa A
July 7, 2018
“Call tracking is to track a phone number and to record the information about the call, which is used to measure the impact of marketing efforts on lead generation and sales.”
Say, you are an entrepreneur or the marketing head of an organization and your main source of leads are phone calls. To spend your marketing dollars wisely, you will have to know which of your campaigns generate the maximum number of calls. This can be done using a call tracking system.
Call tracking systems these days are usually very expensive and cumbersome. In this blog, we would like to explain stepwise an easy call tracking system that combines the powers of twilio and google analytics to give you a very detailed picture of the calls and locations of these calls.

Steps to Implement the call tracking using twilio functions
Step 1: Create a new google analytics account and Twilio call Forward Function
Now, go to google analytics (www.google.com/analytics), sign in to create a new account. For this,
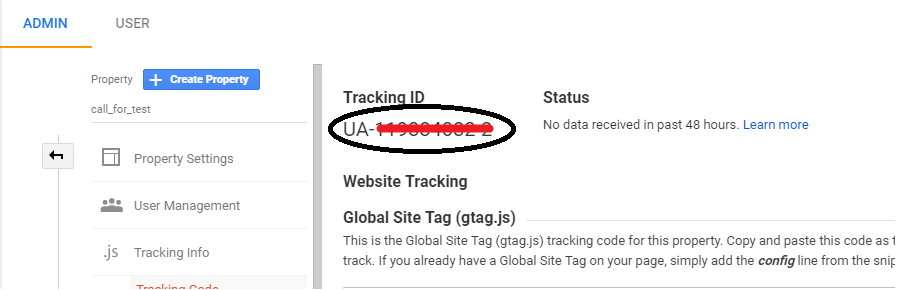
Go to Admin->create account-> give the specification for website tracking. In the required column enter any website name and url(for example, www.example.com), also select the category as industry. To get the Tracking Id Go to Admin -> property ->Property Settings->you can now see the Tracking ID. This tracking id is needed to connect your twilio function and google analytics so it should be noted.
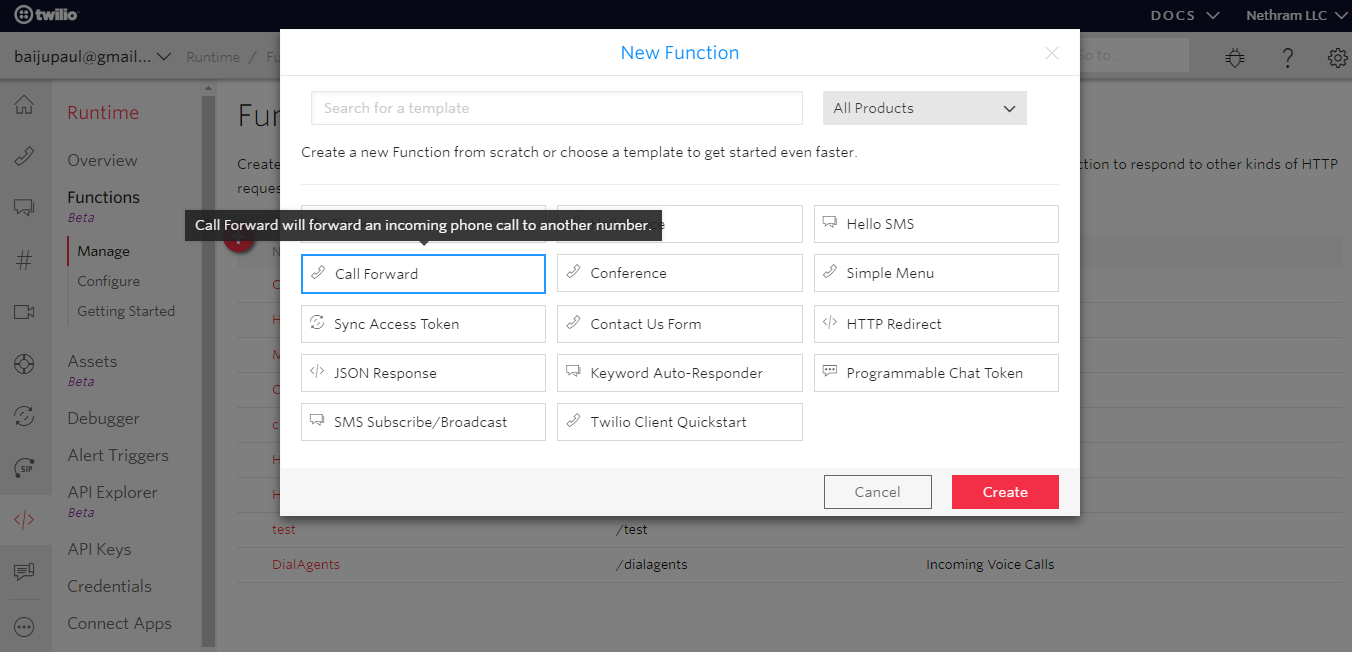
Log in to your Twilio account(www.twilio.com) go to Runtime, Select “Function”, and then click “+” symbol and select “Call forward function” and hit create(to create a new call forward function).
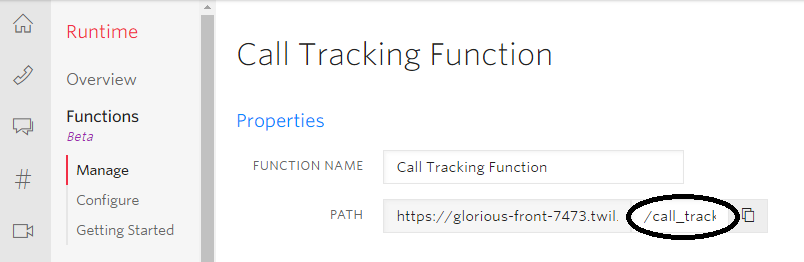
Open the function and give the function name and the path as your choice. This function path is needed later so, copy this path and save the function.
Step 2: Attaching the Twilio Function to their Twilio Number and Tracking Id
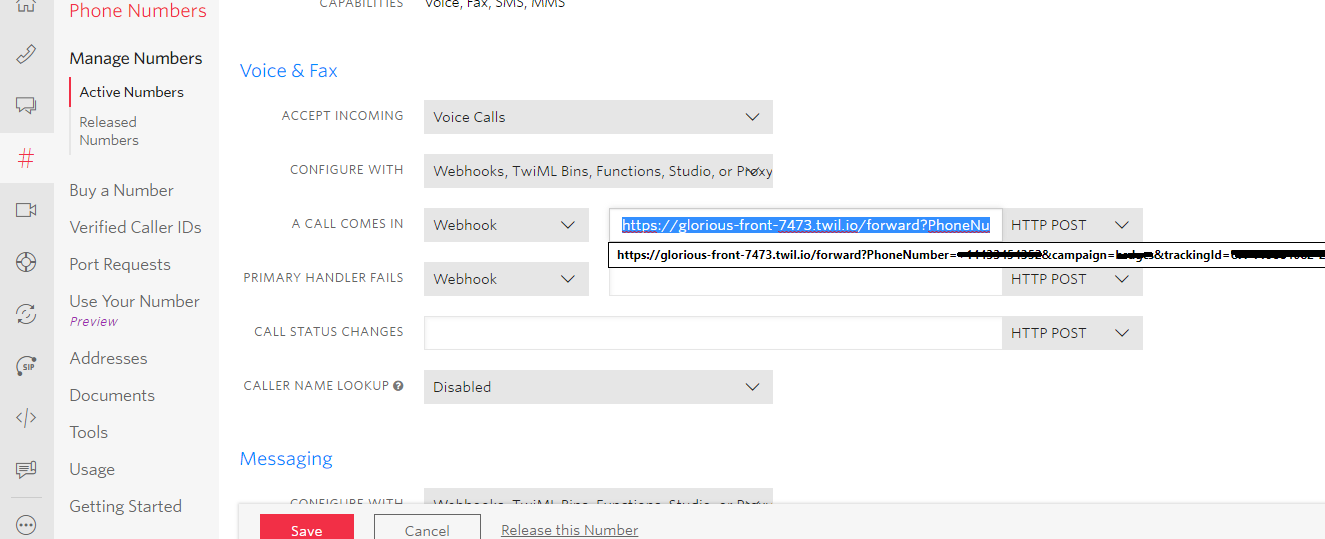
Go to Phone Numbers(# in menu) in your Twilio account and select your twilio number from the list of active numbers. If you don’t have a number, buy a number and then go to Phone Numbers(# in menu) and select the number from the list of active numbers. After selecting the number, go to Voice & Fax option and select Voice calls. In the “A CALL COMES IN” box, set it as webhook and provide the details in the empty box beside it, in the following format:
Paste your function path?PhoneNumber=(here set the actual phone number which you need to be forward all the calls. Remove the spaces and hyphens in the number)&campaign=(here set campaign name of the number you have currently selected))&trackingId=(here set the tracking Id you got from google analytics)
For example,
https://glorious-front-7473.twil.io/callforward?PhoneNumber=+19876543210&campaign=abc_business&trackingId=UA-123456789-1
Don’t forget to save these changes.
You can change the Phone numbers for different campaign for the same trackingId.
Go back to Runtime ->Go to Twilio function and Create Another blank function Similarly, that you have created for call forward function. Give the function name as Call Action and path as /call_action and save the function.
Step 3: Call Forward function.
Go back to the call forward function. This function is used to forward calls that are received by your twilio campaign numbers to the actual phone number of your business through Webhook(HTTP post). The call forward function accepts two parameters i.e., campaign and actual phone number. Paste the following code in the box provided and save the function.
Here is the code for Call Forward function
exports.handler = function(context, event, callback) {
    let phoneNumber = event.PhoneNumber;
    let campaign = event.campaign;
    let trackingId = event.trackingId;
    let domain = context.DOMAIN_NAME;
    let twiml = new Twilio.twiml.VoiceResponse();
    let allowedThrough = true;
//Checking campaign is given or not. If there is no campaign_name the call is not forwarding to another number
    if (campaign === null) {
        allowedThrough = false;
    }
    let dialParams = {};
    if (campaign) {
        dialParams.campaign = campaign;
    }

    var actionUrl ='https://'+domain+'/call_action?PhoneNumber='+phoneNumber+'&campaign='+campaign+'&trackingId='+trackingId;

    if (allowedThrough) {
        twiml.dial(
           {
           action :encodeURI(actionUrl),
           method:'GET'
           },phoneNumber
        );
    }
    else {
        twiml.say('Sorry, you are calling from a restricted number. Good bye.');
    }
// return the TwiML
    callback(null, twiml);
};
Step 4: Linking the system with google analytics
Go back to the Call Action function and paste the following code in the box provided and save the function.
Here is the code for updating events API,
exports.handler = function(context, event, callback) {
var http           = require('http');
const analyticsID  = event.trackingId;
const gaUrl        = "http://www.google-analytics.com/collect?v=1&t=event&tid="+analyticsID+"&";
function sendAnalyticsEvent(eventParams,callback) {
   var url = gaUrl+eventParams;
   http.get(url, function(res) {
       if(res.statusCode === 200){
            console.log("Sent event: status="+res.statusCode+", params", eventParams);
            let twiml = new Twilio.twiml.VoiceResponse();
            twiml.hangup();
            callback(null, twiml);
       }
   }).on('error', function(e) {
       console.log("Sent event: error="+e.message+", params", eventParams);
       let twiml = new Twilio.twiml.VoiceResponse();
       twiml.say('Sorry, there is an error in reporting analyitics. Good bye.');
       callback(null, twiml);
   });
}
    var callerGeoDetail = GeoCode(event.From);
    var callerGeoCode   = callerGeoDetail["code"];
    var contact = event.From;
    var Duration = event.DialCallDuration;
    var CallStatus = event.DialCallStatus;
    if(Duration === undefined){ Duration=0;}
    var eventParams = "ec=Call&ea="+CallStatus+"&ev="+Duration+"&el="+event.campaign+"&t=event&v=1&cid="+contact;
    eventParams += "&geoid="+callerGeoCode;
    sendAnalyticsEvent(eventParams,callback);
};
function GeoCode(number) {
    var _4DigitgeoCodeMapping = get4DigitGeoCodeMapping();
    var _3DigitgeoCodeMapping = get3DigitGeoCodeMapping();
    var _2DigitgeoCodeMapping = get2DigitGeoCodeMapping();
    var _1DigitgeoCodeMapping = get1DigitGeoCodeMapping();
    var get4DigitCallingCode  = number.substring(1, 5);
    var get3DigitCallingCode  = number.substring(1, 4);
    var get2DigitCallingCode  = number.substring(1, 3);
    var get1DigitCallingCode  = number.substring(1, 2);
    var geoCode = _4DigitgeoCodeMapping[get4DigitCallingCode] || _3DigitgeoCodeMapping[get3DigitCallingCode] || _2DigitgeoCodeMapping[get2DigitCallingCode] || _1DigitgeoCodeMapping[get1DigitCallingCode] || "2270";
    console.log("geoCode",geoCode);
    if(geoCode == "20117")// mapping of area code for canadian number.
    {
        var areaCodeToGeoCodeMapping = getAreaCodeToGeoCodeMapping();
        var areaCode    = number.substring(2, 5);
        var geoAreaCode     = areaCodeToGeoCodeMapping[areaCode] || "20117";
        var geoAreaDetails  = {"code": geoAreaCode};
        console.log("geoDetails",geoAreaDetails);
        return geoAreaDetails;
    }
    else{
        var geoDetails = {"code": geoCode};
        console.log("geoDetails",geoDetails);
        return geoDetails;
    }
}

function get4DigitGeoCodeMapping(){
    return{
        "1473":"21137","1671":"2316","1876":"2388","1664":"2500","1670":"2580","1787":"2630","1939":"2630","1869":"2659","1758":"2662","1784":"2670","1868":"2780","1649":"2796","1284":"2850","1340":"2850","1684":"2882","1264":"2660","1268":"2028","1242":"2044","1246":"2052","1441":"2060","1345":"2136","1767":"2212","1809":"2212","1828":"2212","1849":"2212"
    };
}
function get3DigitGeoCodeMapping(){
    return{
        "355":"2008","213":"2012","376":"2020","244":"2024","374":"21519","297":"2533","994":"2031","973":"2048","880":"2050","375":"2112","501":"2084","229":"2204","975":"2064","591":"2068","387":"2070","267":"2072","673":"2096","359":"2100","226":"2854","257":"2108","855":"2116","237":"2120","238":"2132","236":"2140","235":"2148","618":"2162","269":"2174","242":"2178","243":"2180","682":"2184","506":"2188","225":"2430","385":"2191","357":"2196","420":"2203","253":"2262","593":"20264","503":"2222","240":"2226","291":"2232","372":"2233","251":"2231","500":"2238","298":"2234","679":"2242","358":"2246","594":"2254","689":"2258","241":"2266","220":"2270","995":"2268","233":"2288","350":"2292","299":"2304","590":"2312","502":"2320","224":"2324","245":"2324","592":"2328","509":"2332","379":"2336","504":"2340","852":"2344","354":"2352","964":"2368","353":"2372","972":"2376","962":"2400","254":"2404","686":"2296","850":"21331","965":"2414","996":"2417","856":"2418","371":"2428","961":"2422","266":"2426","231":"2430","218":"2434","423":"2438","370":"2440","352":"2442","853":"2446","389":"2807","261":"2450","265":"2454","960":"2462","223":"2466","356":"2470","692":"2584","596":"2474","222":"2478","230":"2480","262":"2175","691":"2583","373":"2498","377":"2492","976":"20167","382":"2499","212":"2504","258":"2508","264":"2516","674":"2520","977":"2524","599":"2530","687":"2540","505":"2558","227":"2562","234":"2566","683":"2570","672":"2574","968":"2512","680":"2585","970":"2376","507":"21142","675":"2598","595":"2600","870":"2612","351":"2620","974":"2634","250":"2646","290":"2682","508":"2666","685":"2882","378":"21137","239":"2678","966":"2682","221":"2686","381":"2688","248":"2690","232":"2694","421":"2703","386":"2705","677":"2090","252":"2706","249":"21176","597":"2740","268":"2748","963":"2368","886":"2158","992":"2762","255":"2834","670":"2626","228":"2768","690":"2772","676":"2776","216":"2788","993":"2795","688":"2798","256":"2800","380":"2804","971":"2784","598":"2858","998":"2860","678":"2548","681":"2876","967":"2887","260":"2894","263":"2716"
    };
}

function get2DigitGeoCodeMapping(){
    return{
        "93":"2004","54":"20008","61":"20035","43":"20048","32":"2056","55":"20088","57":"20114","53":"21147","45":"21154","20":"21164","33":"20332","49":"20235","30":"2300","36":"2348","91":"2356","62":"2360","98":"2368","81":"20624","76":"2398","77":"2398","82":"21331","60":"20737","52":"21142","31":"2528","64":"2554","92":"2586","51":"2604","63":"2608","48":"20862","40":"21244","65":"2702","27":"21222","34":"20282","94":"2144","47":"2744","46":"21014","41":"20133","66":"21044","90":"21354","44":"20339","58":"21204","84":"21044"
    };
}
function get1DigitGeoCodeMapping(){
    return{
        "1":"20117","7":"20931"
    };
}

function getAreaCodeToGeoCodeMapping() {
    return {
        "907": "21132", "205": "21133", "251": "21133", "256": "21133", "334": "21133", "479": "21135", "501": "21135",
        "870": "21135", "480": "21136", "520": "21136", "602": "21136", "623": "21136", "928": "21136", "209": "21137",
        "213": "21137", "310": "21137", "323": "21137", "408": "21137", "415": "21137", "424": "21137", "510": "21137",
        "530": "21137", "559": "21137", "562": "21137", "619": "21137", "626": "21137", "650": "21137", "661": "21137",
        "707": "21137", "714": "21137", "760": "21137", "805": "21137", "818": "21137", "831": "21137", "858": "21137",
        "909": "21137", "916": "21137", "925": "21137", "949": "21137", "303": "21138", "719": "21138", "720": "21138",
        "970": "21138", "203": "21139", "475": "21139", "860": "21139", "959": "21139", "202": "21140", "302": "21141",
        "239": "21142", "305": "21142", "321": "21142", "352": "21142", "386": "21142", "407":"21142", "561": "21142",
        "727": "21142", "754": "21142", "772": "21142", "786": "21142", "813": "21142", "850": "21142", "863": "21142",
        "904": "21142", "941": "21142", "954": "21142", "229": "21143", "404": "21143", "470": "21143", "478": "21143",
        "678": "21143", "706": "21143", "770": "21143", "912": "21143", "808": "21144", "319": "21145", "515": "21145",
        "563": "21145", "641": "21145", "712": "21145", "208": "21146", "217": "21147", "224": "21147", "309": "21147",
        "312": "21147", "331": "21147", "464": "21147", "618": "21147", "630": "21147", "708": "21147", "773": "21147",
        "815": "21147", "847": "21147", "872": "21147", "219": "21148", "260": "21148", "317": "21148", "574": "21148",
        "765": "21148", "812": "21148", "316": "21149", "620": "21149", "785": "21149", "913": "21149", "270": "21150",
        "502": "21150", "606": "21150", "859": "21150", "225": "21151", "318": "21151", "337": "21151", "504": "21151",
        "985": "21151", "339": "21152", "351": "21152", "413": "21152", "508": "21152", "617": "21152", "774": "21152",
        "781": "21152", "857": "21152", "978": "21152", "227": "21153", "240": "21153", "301": "21153", "410": "21153",
        "443": "21153", "667": "21153", "207": "21154", "231": "21155", "248": "21155", "269": "21155", "313": "21155",
        "517": "21155", "586": "21155", "616": "21155", "734": "21155", "810": "21155", "906": "21155", "947": "21155",
        "989": "21155", "218": "21156", "320": "21156", "507": "21156", "612": "21156", "651": "21156", "763": "21156",
        "952": "21156", "314": "21157", "417": "21157", "557": "21157", "573": "21157", "636": "21157", "660": "21157",
        "816": "21157", "975": "21157", "228": "21158", "601": "21158", "662": "21158", "406": "21159", "252": "21160",
        "336": "21160", "704": "21160", "828": "21160", "910": "21160", "919": "21160", "980": "21160", "984": "21160",
        "701": "21161", "308": "21162", "402": "21162", "603": "21163", "201": "21164", "551": "21164", "609": "21164",
        "732": "21164", "848": "21164", "856": "21164", "862": "21164", "908": "21164", "973": "21164", "505": "21165",
        "702": "21166", "775": "21166", "212": "21167", "315": "21167", "347": "21167", "516": "21167", "518": "21167",
        "585": "21167", "607": "21167", "631": "21167", "646": "21167", "716": "21167", "718": "21167", "845": "21167",
        "914": "21167", "917": "21167", "216": "21168", "234": "21168", "283": "21168", "330": "21168", "419": "21168",
        "440": "21168", "513": "21168", "567": "21168", "614": "21168", "740": "21168", "937": "21168", "405": "21169",
        "580": "21169", "918": "21169", "503": "21170", "541": "21170", "971": "21170", "215": "21171", "267": "21171",
        "412": "21171", "445": "21171", "484": "21171", "570": "21171", "610": "21171", "717": "21171", "724": "21171",
        "814": "21171", "835": "21171", "878": "21171", "401": "21172", "803": "21173", "843": "21173", "864": "21173",
        "605": "21174", "423": "21175", "615": "21175", "731": "21175", "865": "21175", "901": "21175", "931": "21175",
        "210": "21176", "214": "21176", "254": "21176", "281": "21176", "361": "21176", "409": "21176", "469": "21176",
        "512": "21176", "682": "21176", "713": "21176", "737": "21176", "806": "21176", "817": "21176", "830": "21176",
        "832": "21176", "903": "21176", "915": "21176", "936": "21176", "940": "21176", "956": "21176", "972": "21176",
        "979": "21176", "435": "21177", "801": "21177", "276": "21178", "434": "21178", "540": "21178", "571": "21178",
        "703": "21178", "757": "21178", "804": "21178", "802": "21179", "206": "21180", "253": "21180", "360": "21180",
        "425": "21180", "509": "21180", "564": "21180", "262": "21182", "414": "21182", "608": "21182", "715": "21182",
        "920": "21182", "304": "21183", "307": "21184"
    };
}
Note: Call are tagged at the country level. However, calls from US and Canada are further resolved to the state or province in Google Analytics. Calls from any unknown country are marked as Gambia.
After completing these steps, you can test it by calling to the twilio number you have setup.
Results in Google Analytics
The results can be viewed in the google analytics account you had created in step 1.
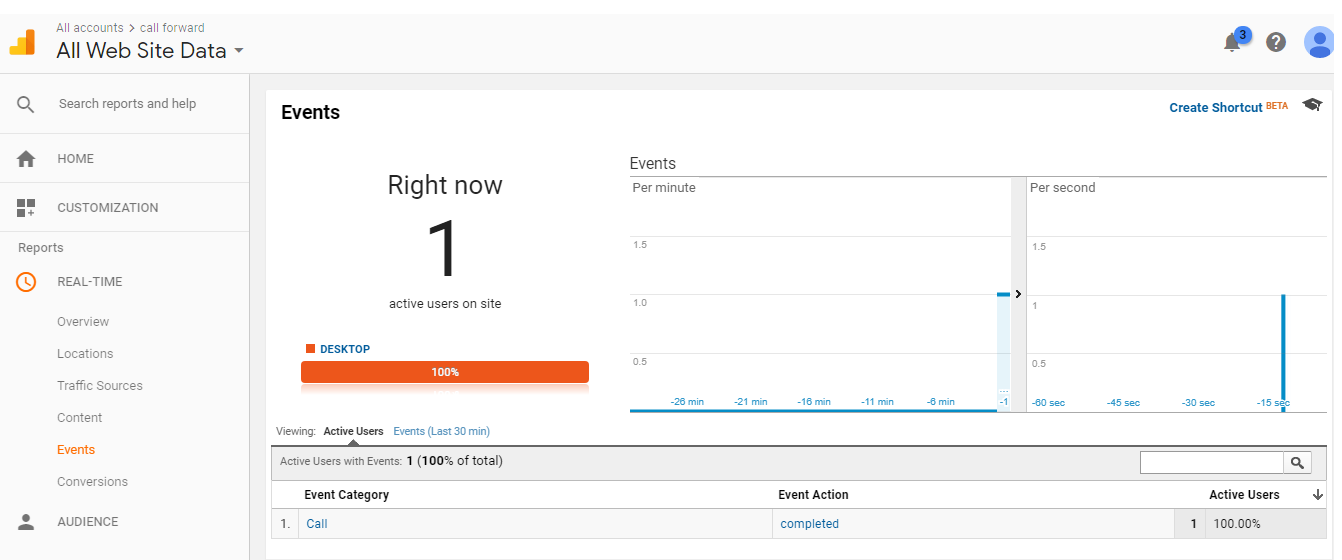
Login to google analytics account that you have created for call tracking. Go to real-time, select events there you can see the live results of call tracking as given in the below figure..
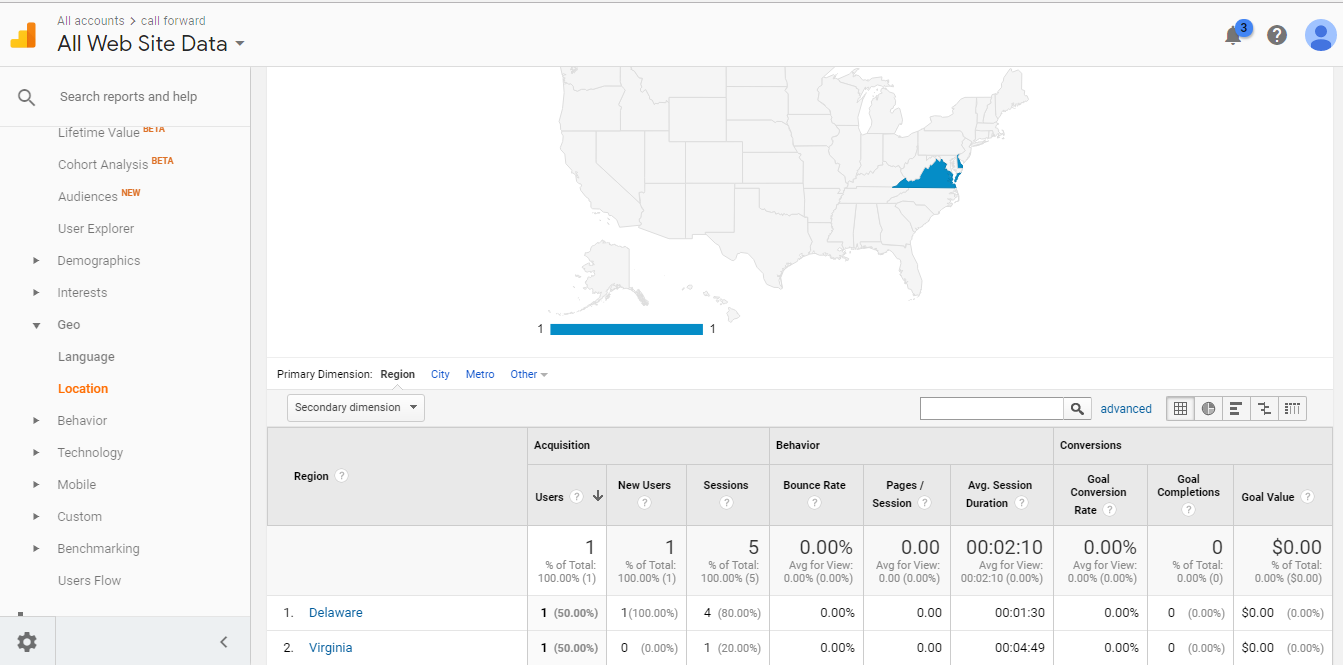
To see the location of the caller. Go to Audience -> geo -> location.
To see the accumulated results of the call tracking,
Go to Behaviour ->Events->Overview
This Overview represents the call tracking data over a month. The present day details are noted in real-time->events.
You can select the range of the days at the right top of your window.

In the above events graph,
1. Total events : Total number of calls.
2. Unique events : Total number of unique calls.
3. Event value : total call duration for all calls.
4. Average value : Average call duration.
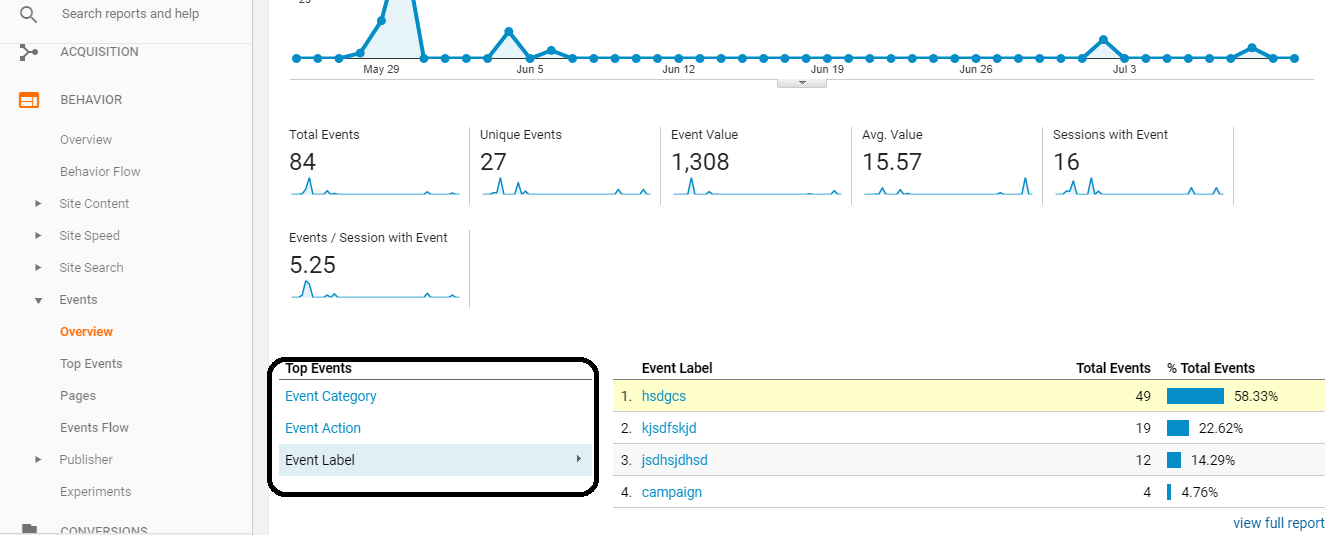
To see the results for different campaign. Click “Event Label” to choose campaign.
To know Calls Status. Click “Event action”.
Thus, using twilio call tracking function,you can get a clear picture of the impact of your marketing efforts on lead generation and sales and you can also make your campaigns more effective and cost efficient based on these results.
Fax is now Easy with Twilio: Meet Twilio Programmable Fax.
ANOOP V M
June 29, 2018
“Let fax reintroduce itself. Now it is very easy to send and receive faxes through twilio programmable fax.”
Fax is a traditional technology. However, it still is an essential tool for a variety of organizations – from hospitals to law offices, from pizza shops to the offices of the Federal Bureau of Investigation . Traditionally Fax required a machine, was offline and brittle. Today, it’s online and ready to work for you. Twilioid allows you to send fax from a fax capable twilio number to a traditional fax machine. It is also possible receive FAX from a fax machine to a twilio number. FAX between two Twilio numbers is also supported.
In this Blog, first we will demonstrate how to set up a twilio fax number then how to send and receive faxes in twilioid between twilio numbers and fax machines.
Setting Up Twilio Fax Number
After signing in to your twilioid account, you can set an existing number in your twilio account as your fax number if the number is fax capable. Alternatively, you can buy and add a new fax number to your account.
Set an existing number as fax number
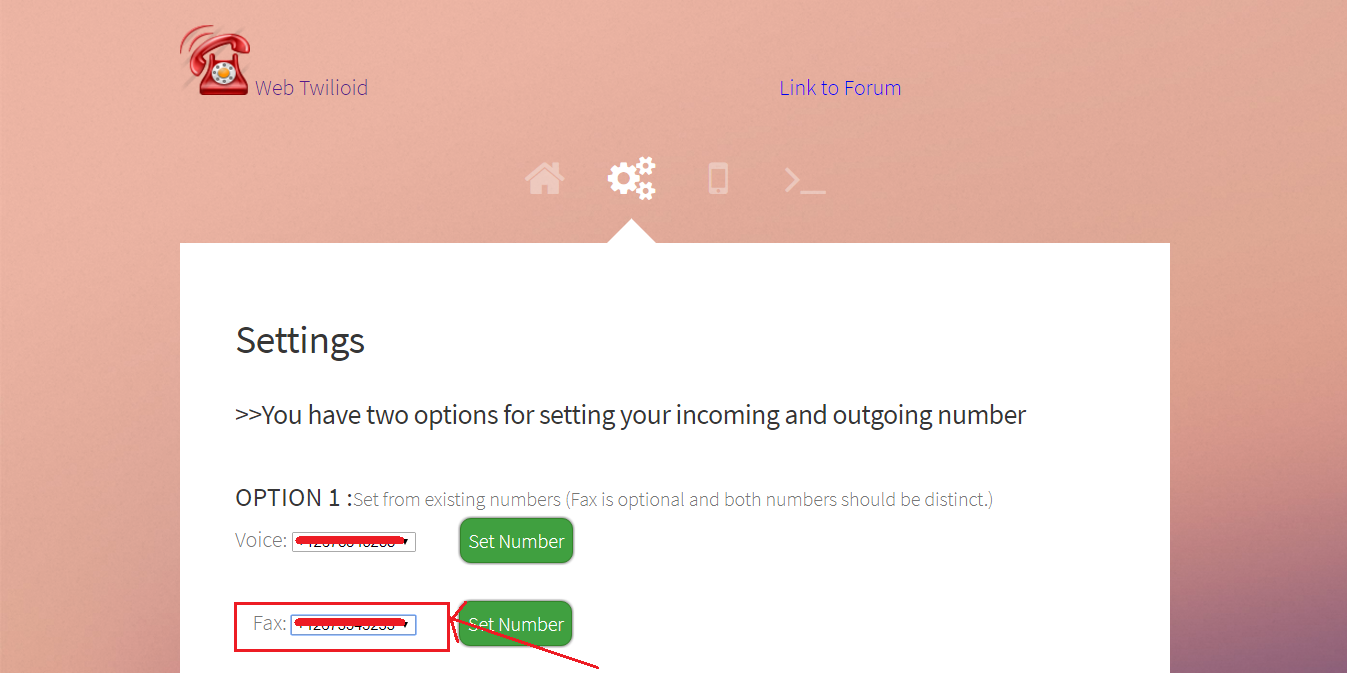
If you have fax supported twilio numbers, you can set any one of these numbers as your fax number.
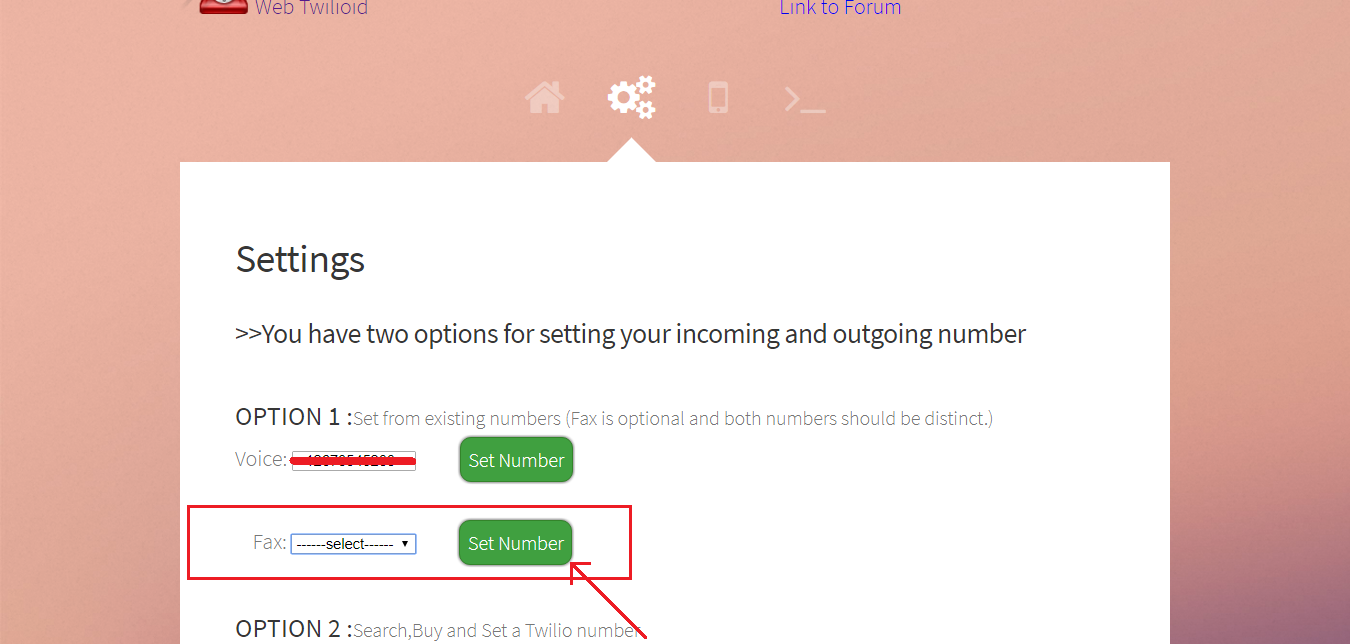
Only fax capable numbers will be listed in Fax list. You can select the number which you want and set it as your fax number by clicking “Set Number” button. One thing should be noted, same number cannot be used for both voice and fax. When you set a fax number to receive fax , number will be unavailable to receive calls. Alternatively you can also set fax number in your twilio account console and link it with the fax url “https://twilioid.com/fax-twiml.php”.
Buy a fax number
If you do not have a twilio number which is capable of sending and receiving faxes, you can buy and add a new one to your account.
Steps
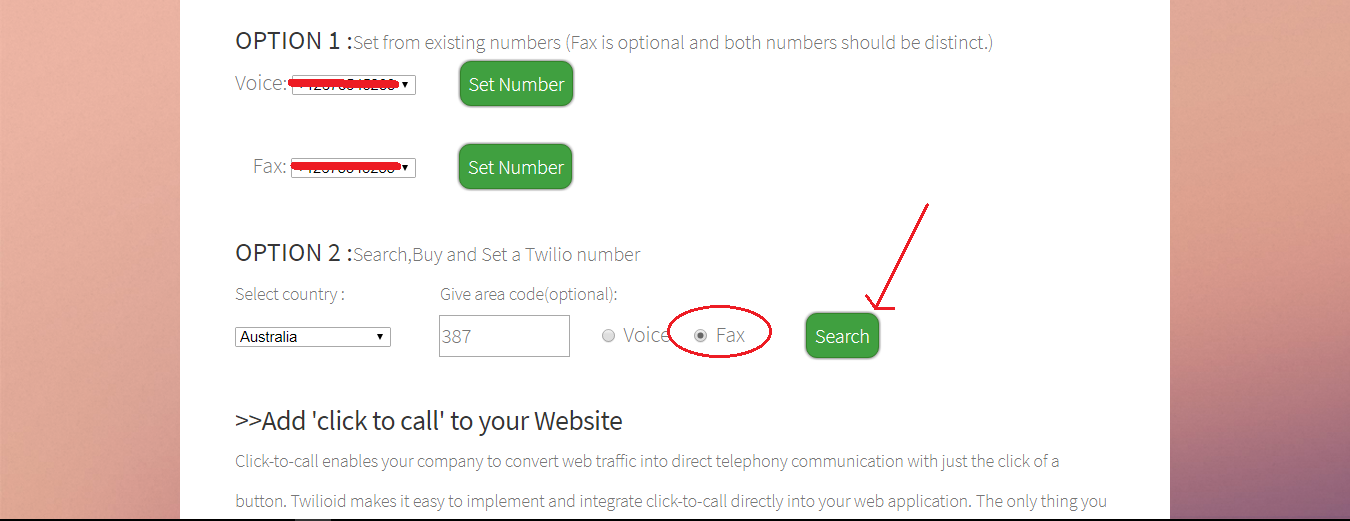
1.You can search numbers by providing country name and an optional area code then clicking the “Search” button. Here, the most important thing is to be noted that you must ensure that the fax capability field is checked instead of the voice.
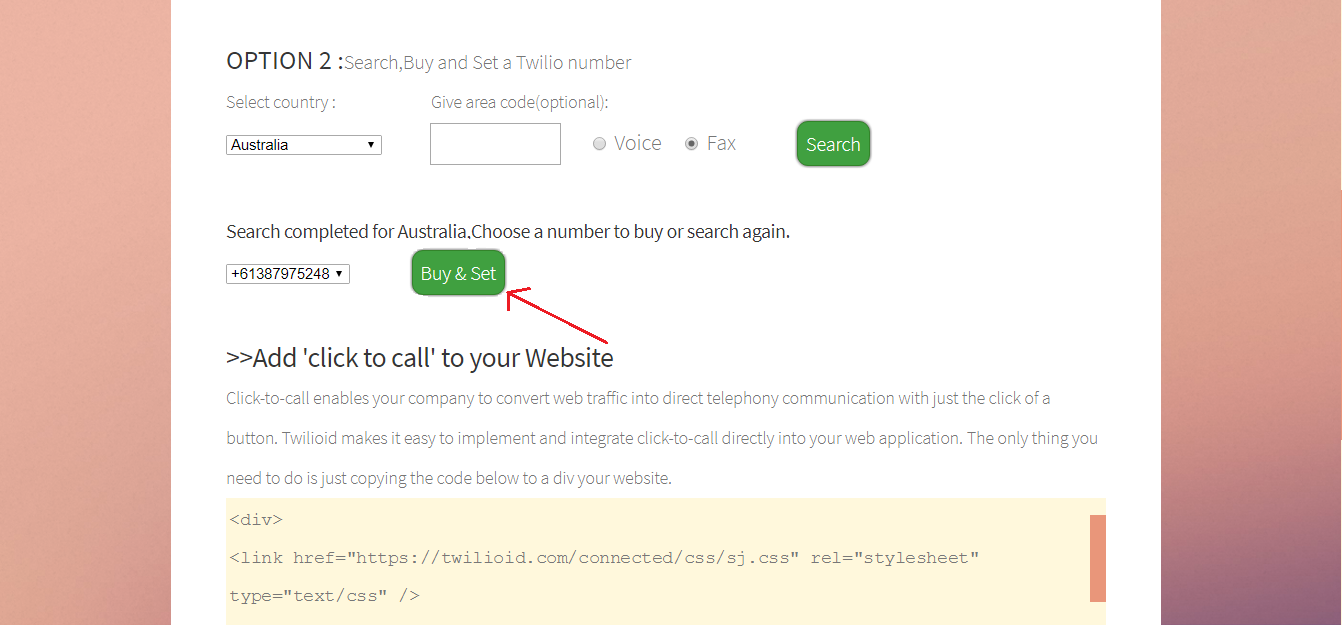
2.Once the search is finished, available numbers with the given requirements will be shown. Now you can purchase a number from the list which you liked most by clicking the “Buy&Set” button. You can purchase number from your twilio account console and link it with the fax url “https://twilioid.com/fax-twiml.php”.
Once you have completed the setup process, Your current fax number will be shown in the fax number field. You may check it to ensure that your fax number is set.
Send Outbound Fax
After setting up your fax number, you can login to your web twilioid account and send fax to a fax machine or another twilio number which is capable of receiving fax.
Steps
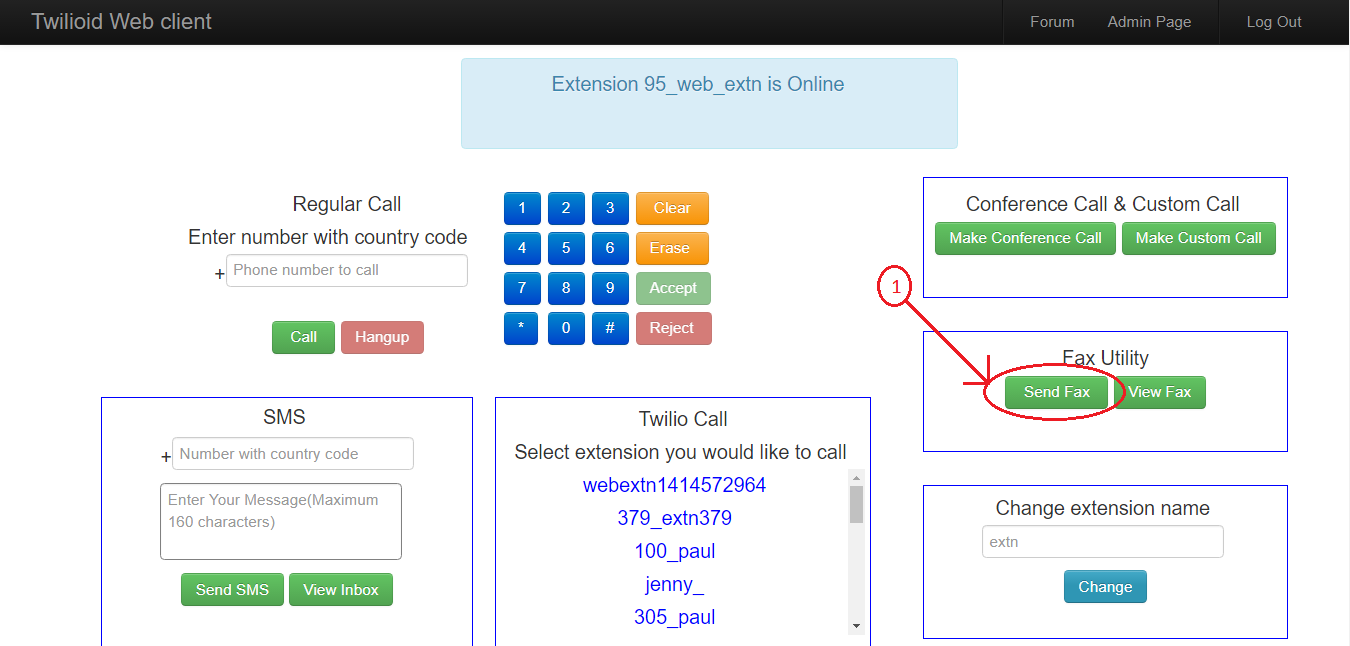
1.In your home page you can see a button labelled as “Send Fax”. Click that button and a window will be opened.
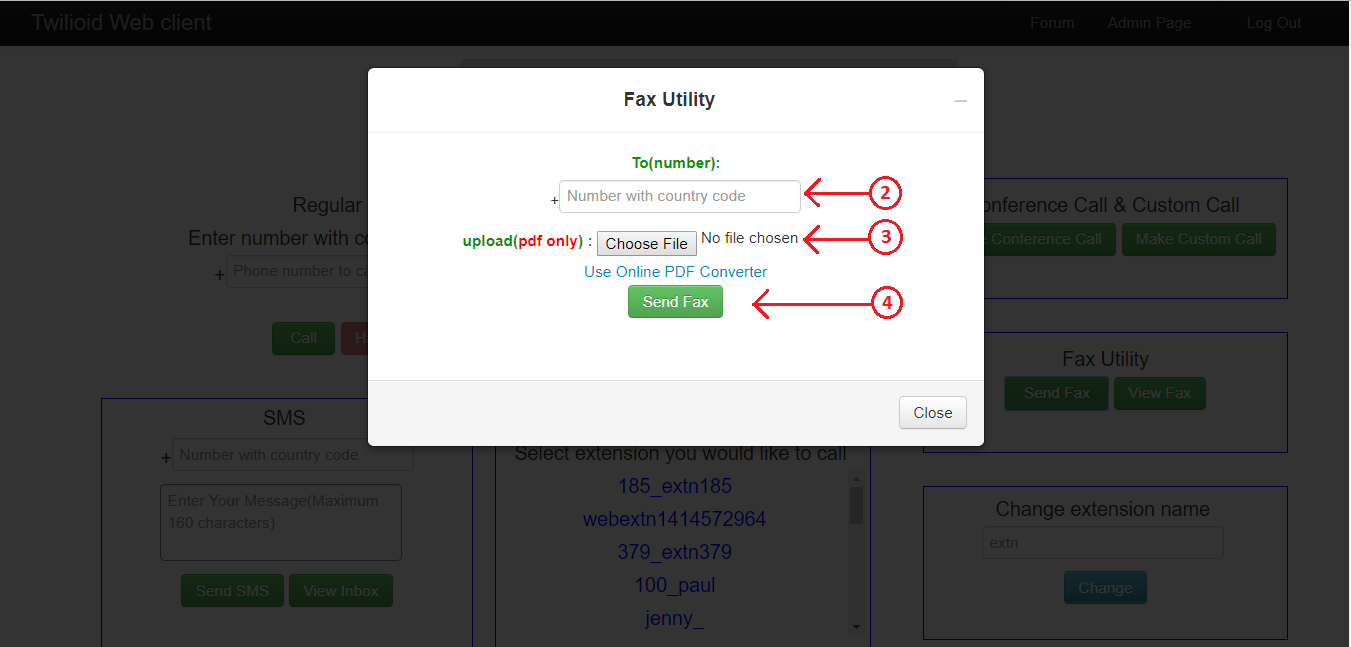
2.Fill the recipient number.
3.Browse the file which you want to send. Currently we support PDF files only.
4.After completing above two steps, click the “Send Fax” button to send fax.
Within moments, your fax should be happily on its way to a lucky recipient. You can also use the “Use Online PDF Converter” link for converting your file to PDF file format.
View Inbound Faxes & Reply
You can also view all inbound faxes received in your fax enabled number and reply to those faxes from your twilioid account.
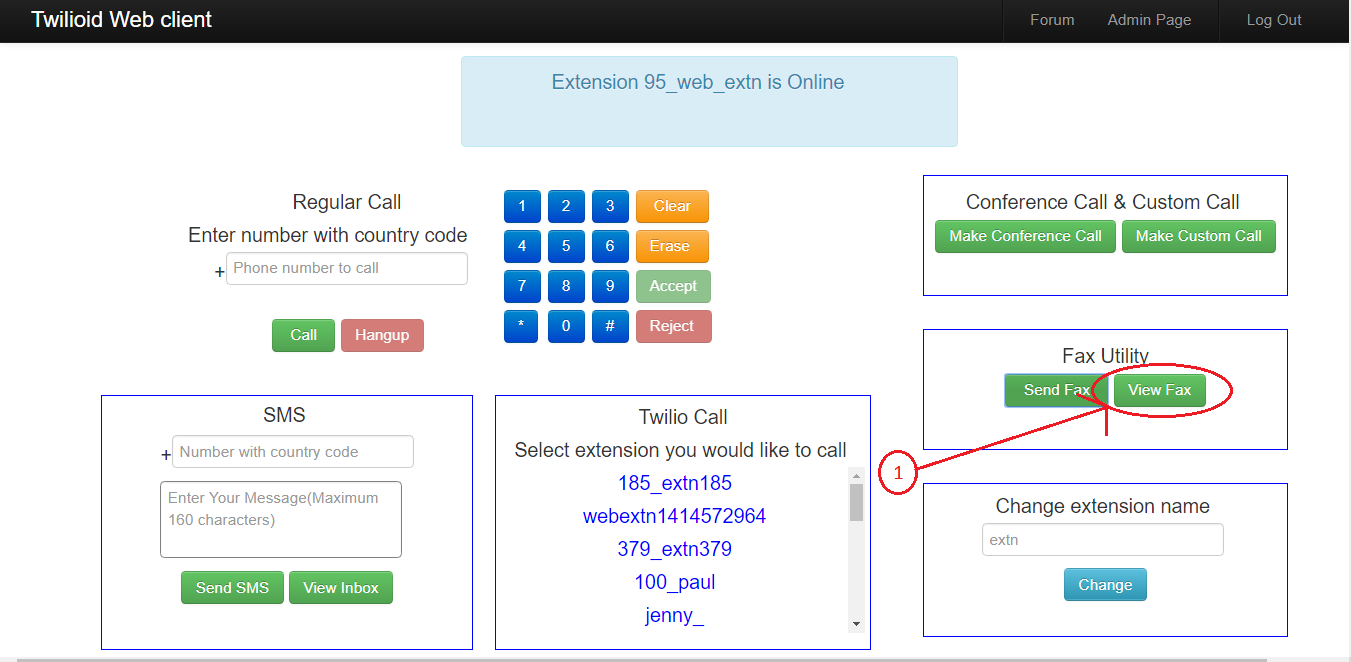
Steps
1.In your home page you can see a button labelled as “View Fax”. Click that button and now a window will be opened before you. Here you can download all incoming faxes and reply.

2.Click the “Download” button to view the fax attachment. Document will be opened in a new tab. You can view and download it as your wish.
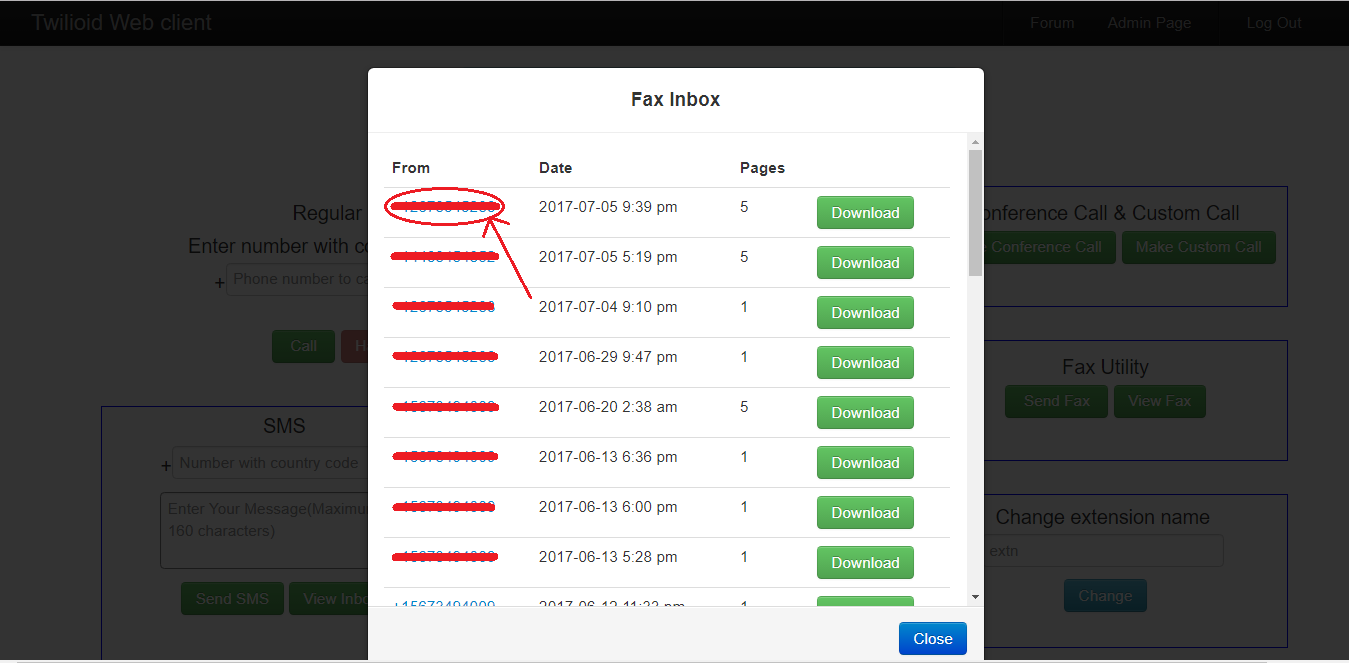
3.Click on the “From” number to open reply window. Now you can select attachment and send as done in above “Send Outbound Fax” section.
Please note that twilio supports only PDF files to be sent . So, ensure that the attachment is PDF.
Thank You !
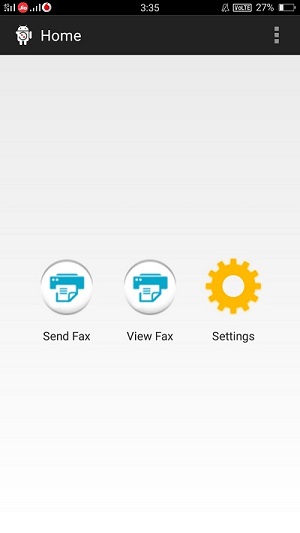
With Twilfax android application, use your phone as a FAX machine
ANOOP V M
August 8, 2017
“FAX with your android phone. Now it is very easy to send and receive faxes in our android phone with Twilfax android app by using twilio programmable fax.”
Fax is a traditional technology. But still it is an essential tool for a variety of organizations – from hospitals to law offices, from pizza shops to the offices of the Federal Investigation Bureau. However, fax was offline and brittle before. Today, it’s online and ready to work for you. Twilfax allows to send and receive faxes between fax capable twilio numbers and fax machines through your android phone.
In this Blog, first we will demonstrate how to set up a twilio fax number then how to send and receive faxes in Twilfax between twilio numbers and fax machines.
You can also learn the whole process by viewing the video Twilfax tutorial .
Setting Up Twilio Fax Number
After signing in to your twilioid account, you can set an existing number in your twilio account as your fax number if it is fax capable or else you can buy and add a new fax number to your account.
Set an existing number as fax number
If you have fax supported twilio numbers, you can set any one of these numbers as your fax number.
Only fax capable numbers will be listed in fax list. You can select the number which you want and set it as your fax number by clicking “Set Number” button. One thing should be noted, same number cannot be used for both voice and fax. When you set a fax number to receive fax , the number will be unavailable to receive calls. Alternatively you can also set fax number in your twilio account console and link it with the fax url “https://twilioid.com/fax-twiml.php”.
Buy a fax number
If you do not have a twilio number which is capable of sending and receiving faxes, you can buy and add a new one to your account.
Steps
1.You can search numbers by providing country name and an optional area code then clicking the “Search” button. Here, the most important thing is to be noted that you must ensure that the fax capability field is checked instead of the voice.
2.Once the search is finished, available numbers with the given requirements will be shown. Now you can purchase a number from the list which you liked most by clicking the “Buy&Set” button. You can purchase number from your twilio account console and link it with the fax url “https://twilioid.com/fax-twiml.php”.
Once you have completed the setup process, Your current fax number will be shown in the fax number field. You may check it to ensure that your fax number is set.
Send and receive your FAX with Twilfax.
The Twilfax app for android can download it from the google play store. To download it click download Twilfax from playstore.
Set up your Twilfax android application.
If you are using the Twilfax application for the first time, you should login with your twilioid credentials.
Steps

1.You will see a screen like the above one. You should have to enter your twilioid login code in the given field to access your twilio account. Then click on “Submit” button.
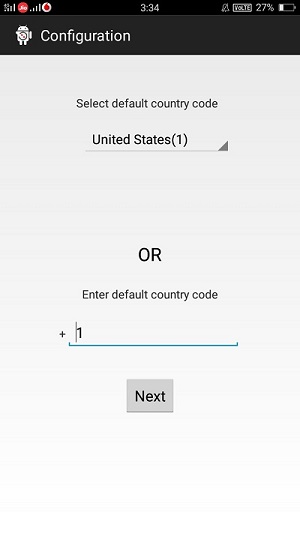
2.Now you will be directed to a screen like the above one. Here you want to set the default country code. This will be helpful for the future use of the application. Select your country code and click on “Next”.
Once the above two steps are finished, you will be directed to the home page as shown above. Now you have completed the setup process.
Send an outbound FAX
Once the setup process has completed, you can now Send your Fax. To send a Fax, you should keep the Fax document which is to be sent as a PDF file in your local storage.
Steps
1. Click on the “Send Fax” button in the home page. Then you will be directed to “Send Fax” screen.
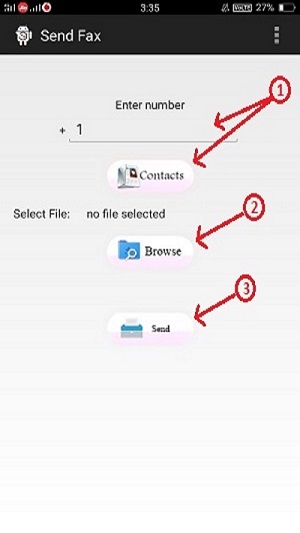
2. In the “Send Fax” screen you have to provide a number to which the fax is to be sent. You can optionally select the number from your contacts by clicking the “Contacts” button. After that you should select an attachment (must be a pdf file) from your local storage by clicking on the “Browse” button. After completing this steps click the “Send” button.
Within moments, your fax should be happily on its way to the lucky recipient.
View inbound Faxes
You can also view the inbound faxes in your twilio number and download it to your local storage.
Steps
1. Click on the “View Fax” button in the home page. Then you will be directed to “Inbound Fax” screen.
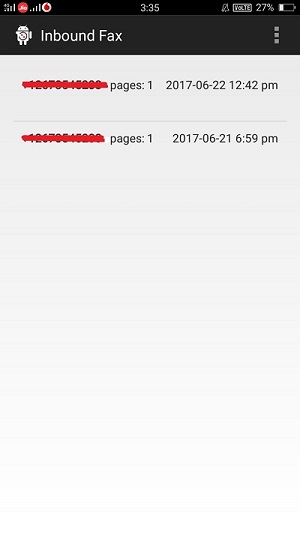
2. In the “Inbound Fax” screen, you can view all your inbound faxes. Click on any item in the list to open the attachment. Then save the file to local storage.
Make Twilio calls using SIP phones – Utilize Twilio Sip
Prajina MP
May 25, 2017
” Make inbound and outbound calls with your sip phone (Hard phone or soft phone) without any additional PBX set up or cloud phone systems. “
Traditionally, connecting a SIP phone and making calls were cumbersome. It required a dedicated PBX, or expensive cloud telephone. With Twilio Voice supporting SIP registration, it is now easy to utilize the Twilio cloud to power your SIP enabled phone. You can use either SIP hard phones such a Cisco, Yealink and Snom or soft phones such as zoiper, x-lite or sj-phone to connect to Twilio and make calls.
In this Blog, we will demonstrate how to register multiple extensions with Twilio, and to make calls between the extensions and also external calls. We have also provided easy to use scripts that you may use from our server, or modify to meet your specific needs.
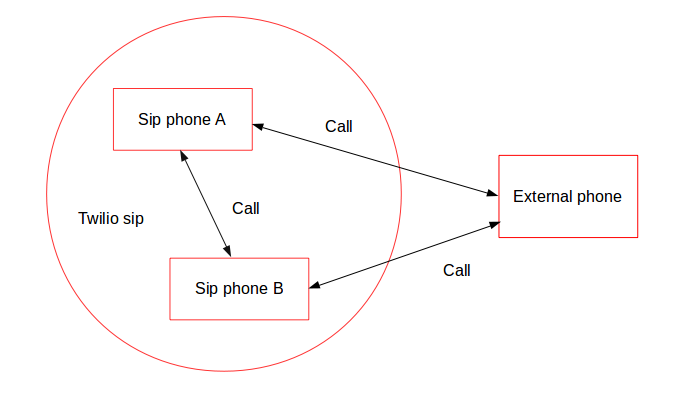
Twilio allows to connect SIP-enabled devices or soft phones directly to Twilio and to use the Voice API to handle calls. The following diagram shows how sip endpoints can make calls within and to out side of the network. Sip endpoints can call each other and can make call to out side.Also can receive call external to the system.
Twilio sip endpoint registration
We are going to register twilio sip end point in android phone and make inbound and outbound calls with twilio sip end points. We are using Zoiper soft phone, but the same procedure applies for other soft or hard VOIP phones.To register and test Twilio domain endpoints you’ll need a twilio account with an incoming phone number and Zoiper soft phone installed on your phone.
Create twilio sip domain
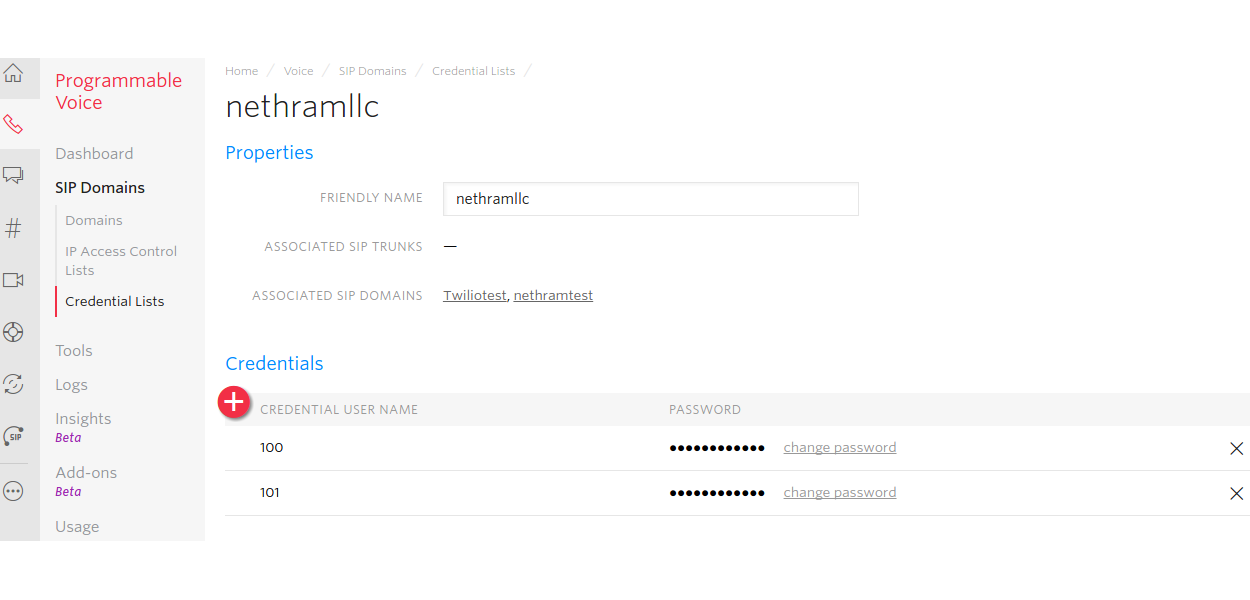
Step 1: Create credential list
Log in to your twilio account go to programmable voice.Select “credential lists” ,create a credential list ,add credentials and save your passwords (we need this later). In this example, your extensions will have a 3 digit number, but with a little programming tweak you may use either 4 digit extensions or even a 1 digit extension.
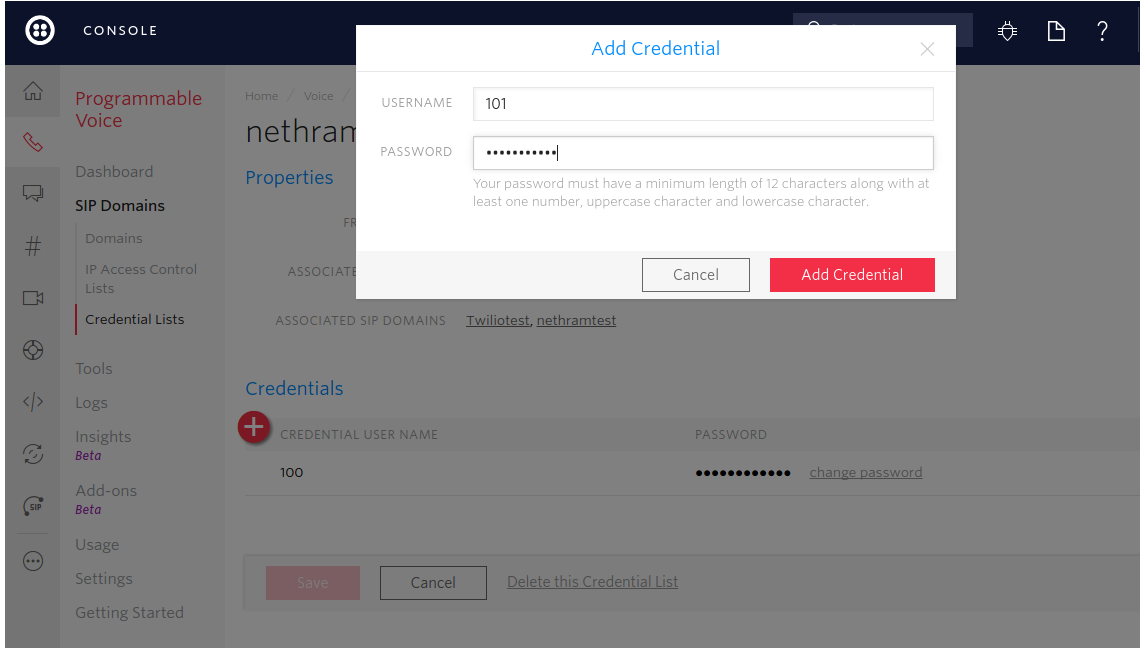
And you have your credentials.
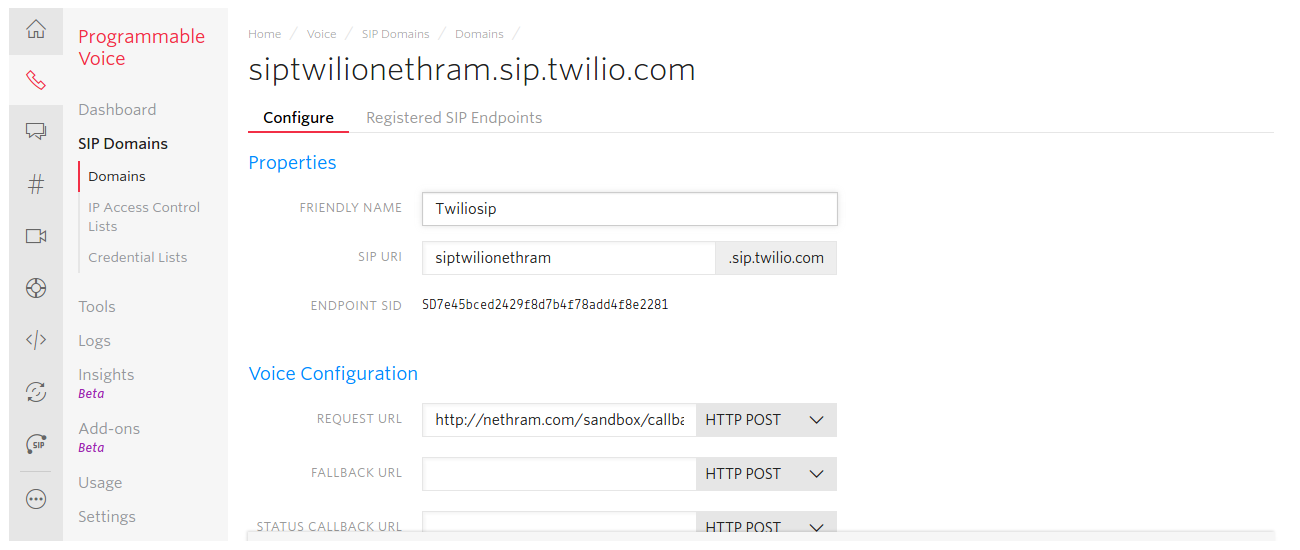
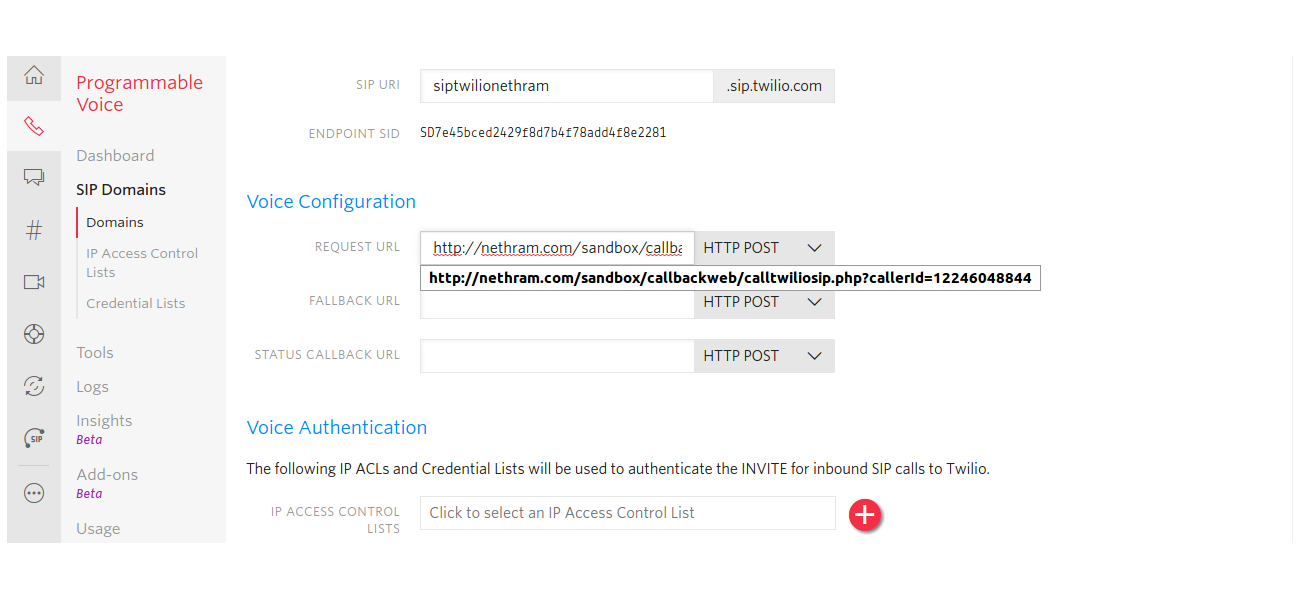
Step 2: Create twilio sip domain.
Select “Domains” and click the “+” icon.Enter a friendly name and a unique sip uri. We also need to change the request url but we are going to do that later.
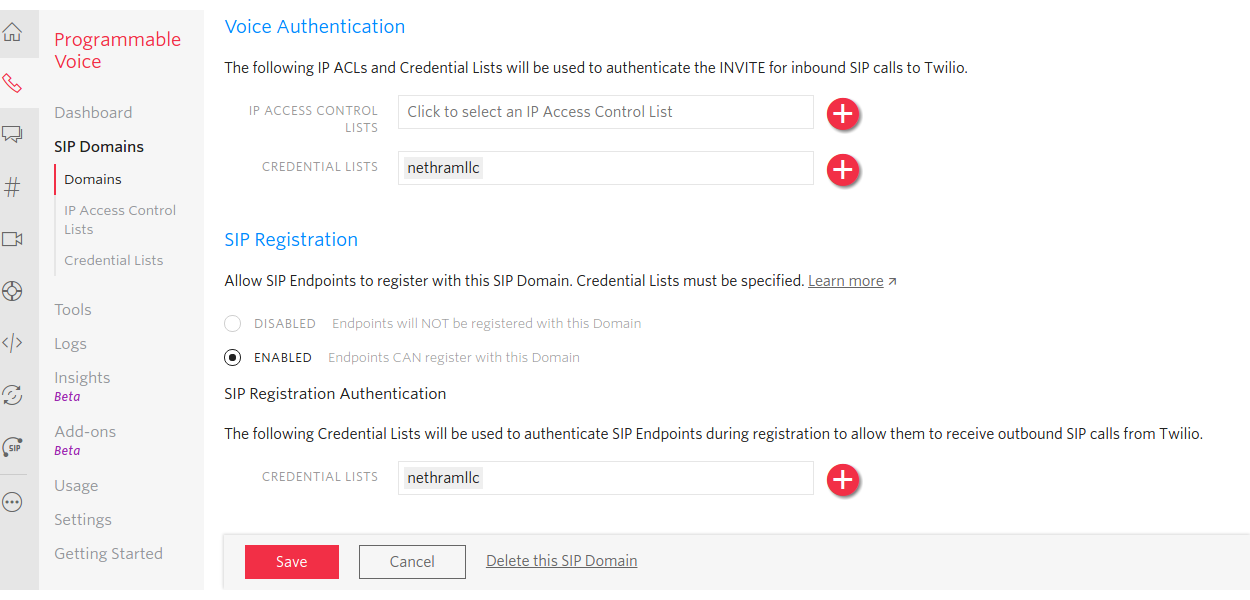
Add your credential lists , enable the allow to register end points, add credential lists and save your domain.
Now we all set to register sip endpoints in android phones.Remember the credentials we added in our credential list.Those are the user name and password pair we are going to use here.
Register twilio sip end points
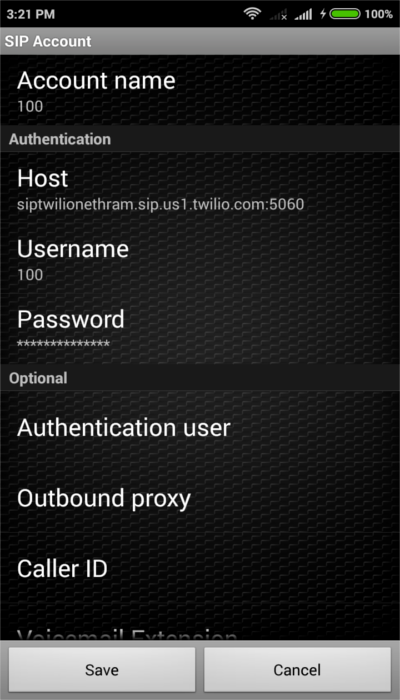
Create new account in zoiper , enter user name and password from your credential.Enter your twilio domain name in the Host field.Don’t forget to add region in sip domain name.
Eg : siptwilionethram.sip.us1.twilio.com
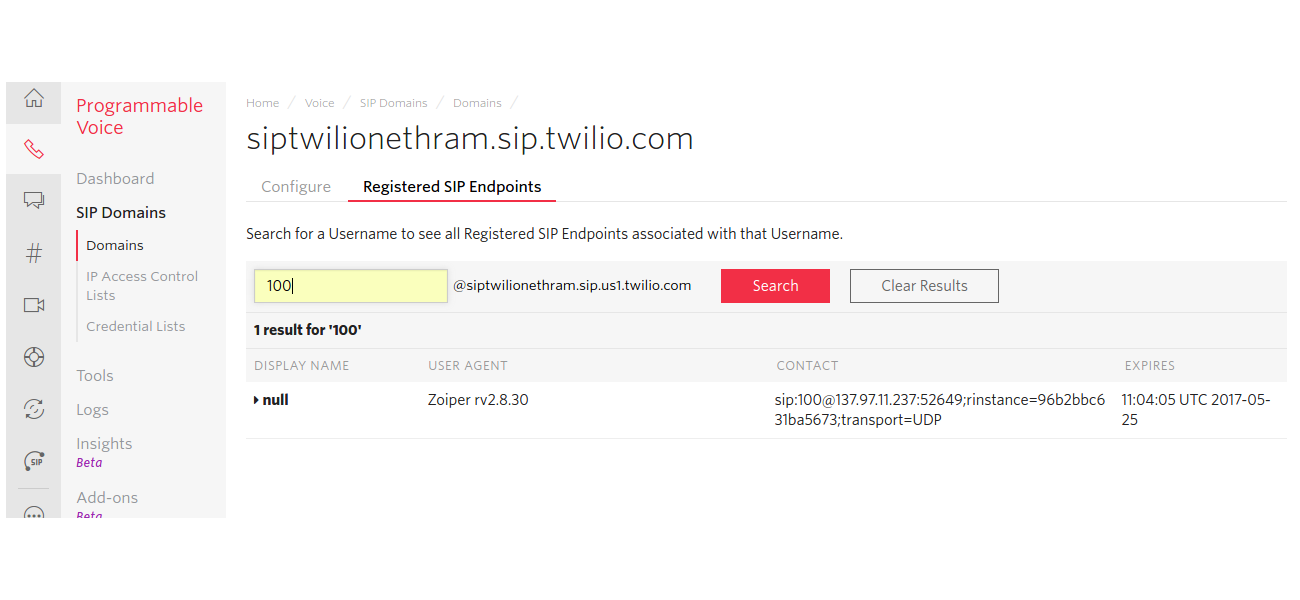
Then save and register your twilio end point.You will see a green dot on successful end point registration .Follow the same procedure and register another end point. That extension can be named as 102. You can see the successfully registered endpoints under your sip domain in the twilio console.
Making Inbound and outbound calls with endpoint
Inbound call
First we make a call to our twilio endpoint by configuring the voice url of a twilio number. You may have to purchase a new number. Create a php script CallToSip with following code or you can use the php script we have hosted at “http://nethram.com/sandbox/Twiliosip/CallToSip.php”
for testing.
<?php
echo header('content-type: text/xml');
echo '<?xml version="1.0" encoding="UTF-8"?>';
/** Get sip endpoint list **/
$params=$_REQUEST['SipUser'];
$toNumberList=explode(",",$params);
?>
<Response>
	<?php
	for($i=0; $i < sizeof($toNumberList) ;$i++) { $to=$toNumberList[$i]; ?>
		<Dial timeout="20">

			<Sip>
				<?php echo $to; ?>
			</Sip>

		</Dial>
		<?php } ?>
</Response>
To dial a sip endpoint configure the twilio incoming phone number’s voice url with
“http://nethram.com/sandbox/Twiliosip/CallToSip.php?SipUser=100@siptwilionethram.sip.us1.twilio.com”.
Or with script hosted in your server. Replace sip endpoint with yours.
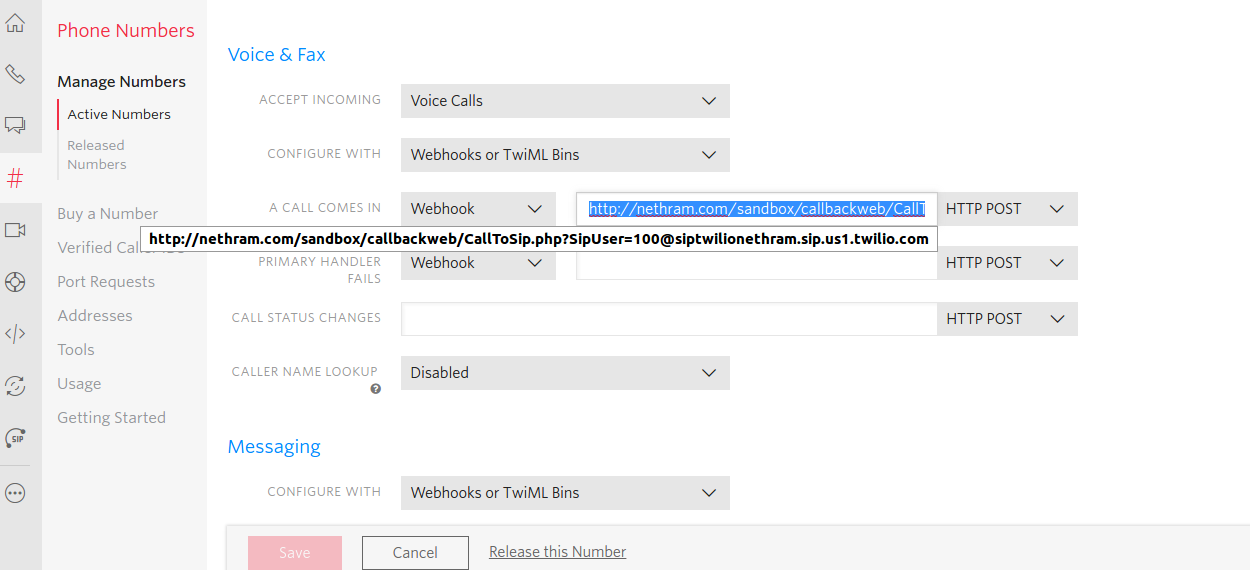
Dial twilio number from any of your voice network and call will be forwarded to your twilio endpoint registered in android phone.
You can also call to multiple sip phones(sip endpoints) by adding coma separated sip end points to voice url as “http://nethram.com/sandbox/callbackweb/CallToSip.php?SipUser=100@siptwilionethram.sip.us1.twilio.com,101@siptwilionethram.sip.us1.twilio.com”.
Out bound call
Next we are going to make call from our twilio end point.Create a new file calltwiliosip.php and copy the following code or you can use script hosted in our sever
“https://www.nethram.com/sandbox/callbackweb/calltwiliosip.php”.
<?php
echo header('content-type: text/xml');
echo '<?xml version="1.0" encoding="UTF-8"?>';
$to=$_REQUEST['To'];
$callerId=$_REQUEST["callerId"];
/** Extracting user name **/
$pos1 = strpos($to,":");
$pos2 = strpos($to,"@");
$tosip=substr($to,$pos1+1,$pos2-$pos1-1);
if(strlen($tosip) == 3)
{
/**Extracting sip endpoint**/
    $pos2 = strpos($to,":",strpos($to,":")+1);
    $tosip=substr($to,$pos1+1,$pos2-$pos1-1);

    ?>
    <Response>
        <Dial>
            <Sip>
                <?php echo $tosip; ?>
            </Sip>
        </Dial>
    </Response>
    <?php } else { if(substr($tosip,0,2)=="00") $tosip=substr($tosip,2,strlen($tosip)-1); if(substr($tosip,0,3)=="011") $tosip=substr($tosip,3,strlen($tosip)-1); ?>
    <Response>
        <Dial callerId="<?php echo $callerId; ?>" >
            <?php echo $tosip; ?>
        </Dial>
    </Response>
    <?php } ?>
Configure your sip domain’s voice url with
“https://www.nethram.com/sandbox/callbackweb/calltwiliosip.php?callerId=+12246048844” or the script hosted in your server , replace callerId with any of your twilio incoming phone number, or a verified Twilo number.
If the user dials a 3 digit number then the script assumes that it will be a sip extension and script will forward the call to the corresponding sip extension. In all other cases, the script assumes that it is a phone number and call will be forwarded to the corresponding number. International numbers should have a 00 or 011 prefix, and the this prefix will be substituted with “+”.
To test first case dial 100 (registered end point username) from zoiper soft phone.Dial a 10 digit phone number to test the second case.If you dial an international phone number be sure that global permissions for the country is enabled in your Twilio account.
AWS Lambda Tutorial: Step by step instructions to create a scalable web application – Part 4
Arunbalan
January 27, 2016

Configuring Amazon API Gateway and finishing application
STEP 1: CONFIGURING THE APIS.
Now your lambda functions are ready and functioning. The next step is to enable them to access from the Amazon API Gateway and pass the necessary parameter to each Lambda function.
In the same page where you upload your lambda function click the Get method under the API endpoints tab. Then it directs you to a new page where you can configure your API. A new page will appear as below. Click on your API (for example – CreateAccount ).
 In API Gateway, a mapping template is used to transform some data from one format to another. You create and use input mapping templates when you need to inform API Gateway about the schema of the data that is given to lambda function and you can use output mapping templates for output of the lambda function. You can create models that enable API Gateway to make it easier for you to create mapping templates.
- Click on the GET method under the Resource tab. You will get a screen like below image.
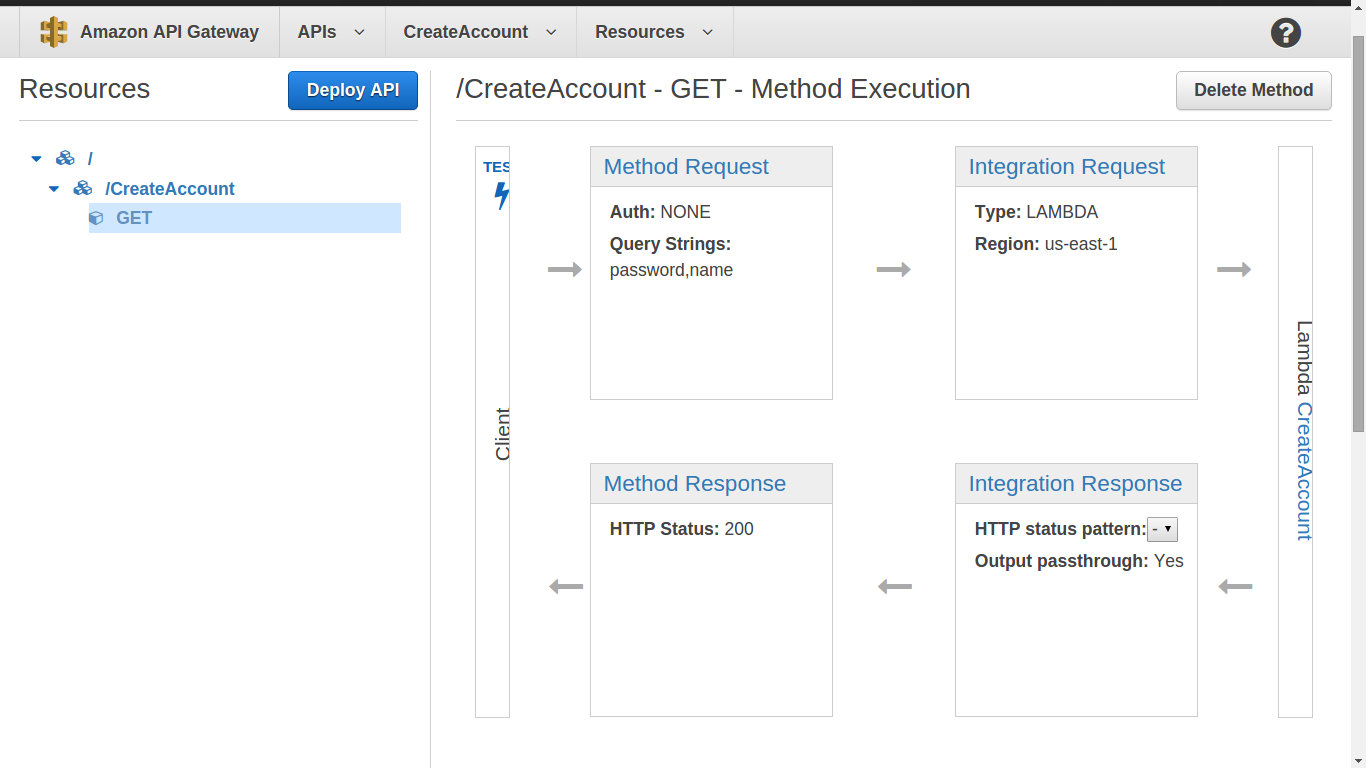
- Select Method Request from the first box to set the URL Query String Parameters and input model. Click Add query stringunder the URL Query String Parameters section. Enter two parameters name and password click and submit . Then set the input model by clicking Add Model, then a new screen will display. Enter the model name as Input Model. In the edit field type the code provided below
      {
        "$schema": "http://json-schema.org/draft-04/schema#",
        "title": "CreateAccount",
        "type": "object",
        "properties": {
                       "name": { "type": "string" },
                       “password”: {“type”:”string”}
                      }
      }
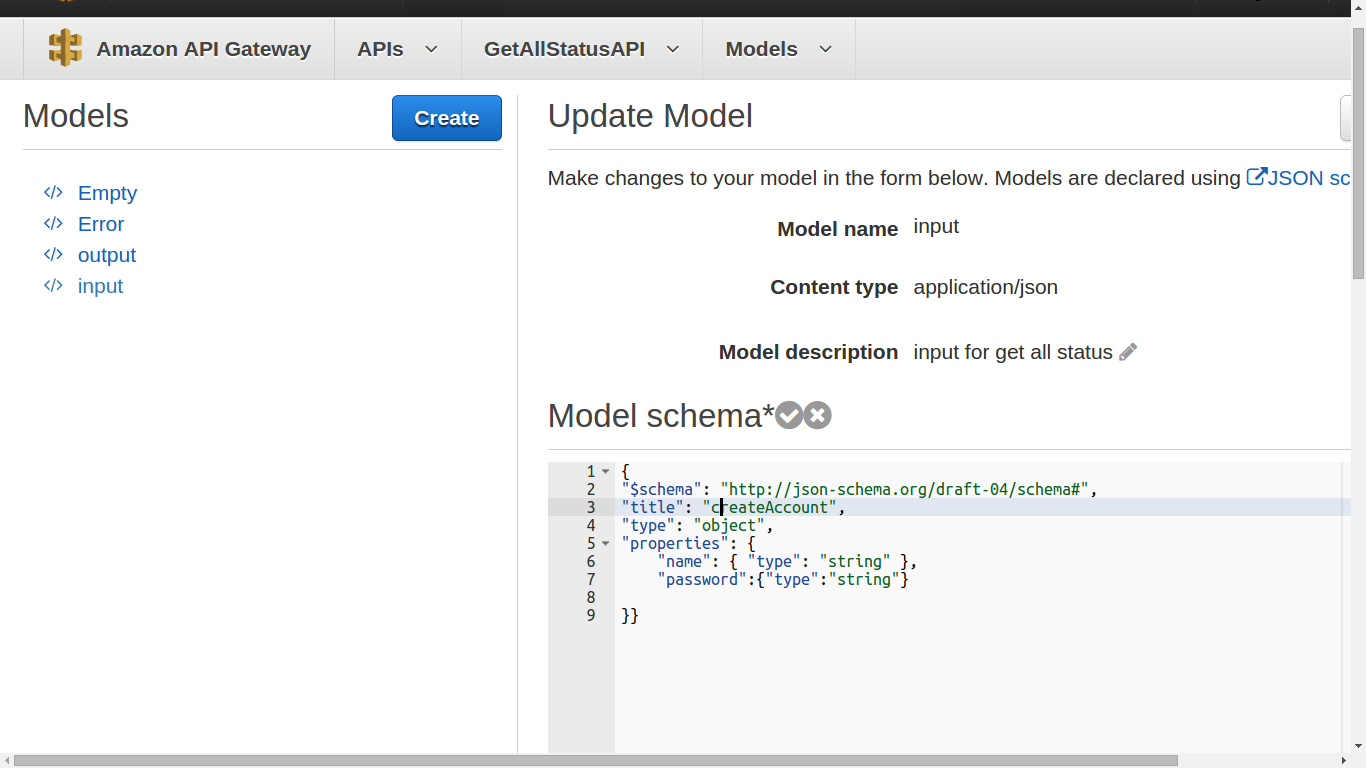
Note: Here in this example we are giving two parameters under the properties key, because this model is using for CreateAccountfunction’s API configuration. In order to do the same for UpdateStatus function API we needed to include one more parameter inside the properties. The third parameter is the status parameter.
- Next Select the Integration Request block and Select the Integration type as Lambda Function, Then Select your lambda function name. You can create a Mapping template under the mapping template section. Under the Content-type tab add application/json and submit. Add codes to mapping template edit window. The sample code is given below.
     {
       "name": "$input.params(‘name)",
       “password”: “$input.params(“password”)”
     }
Now the parameter query string parameter is passed to the here and a new json formatted body is created.
- Now the parameter required for the lambda function is converted to the well formatted json content. Lambda will pass all parameters after making it as string using JSON.Stringify method. So we need to capture the result and change it into the desired format as we needed.
Select Integration Response section to create an output mapping template. It is similar to the template that we did in Integration Request to create input mapping template. Select the Content-Type as application/json. The HTML page is stored inside a variable. That same string we needed to capture from the lambda function. Follow the code given below
      #set($inputRoot = $input.path('$'))
      $inputRoot.respon
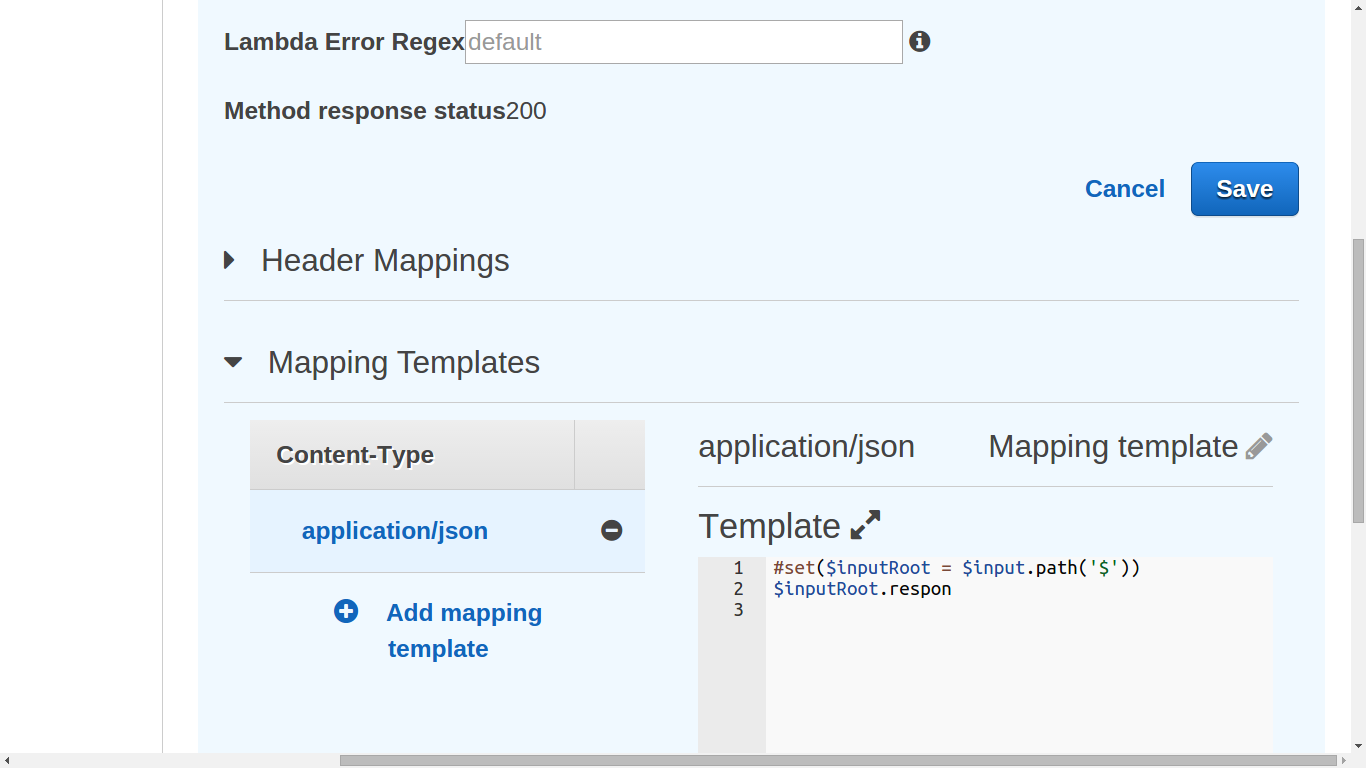
- The result is now in JSON format. We need to convert its Content-Type into text/html in order to get an HTML page as output. Otherwise there should be quotes outside the HTML codes.
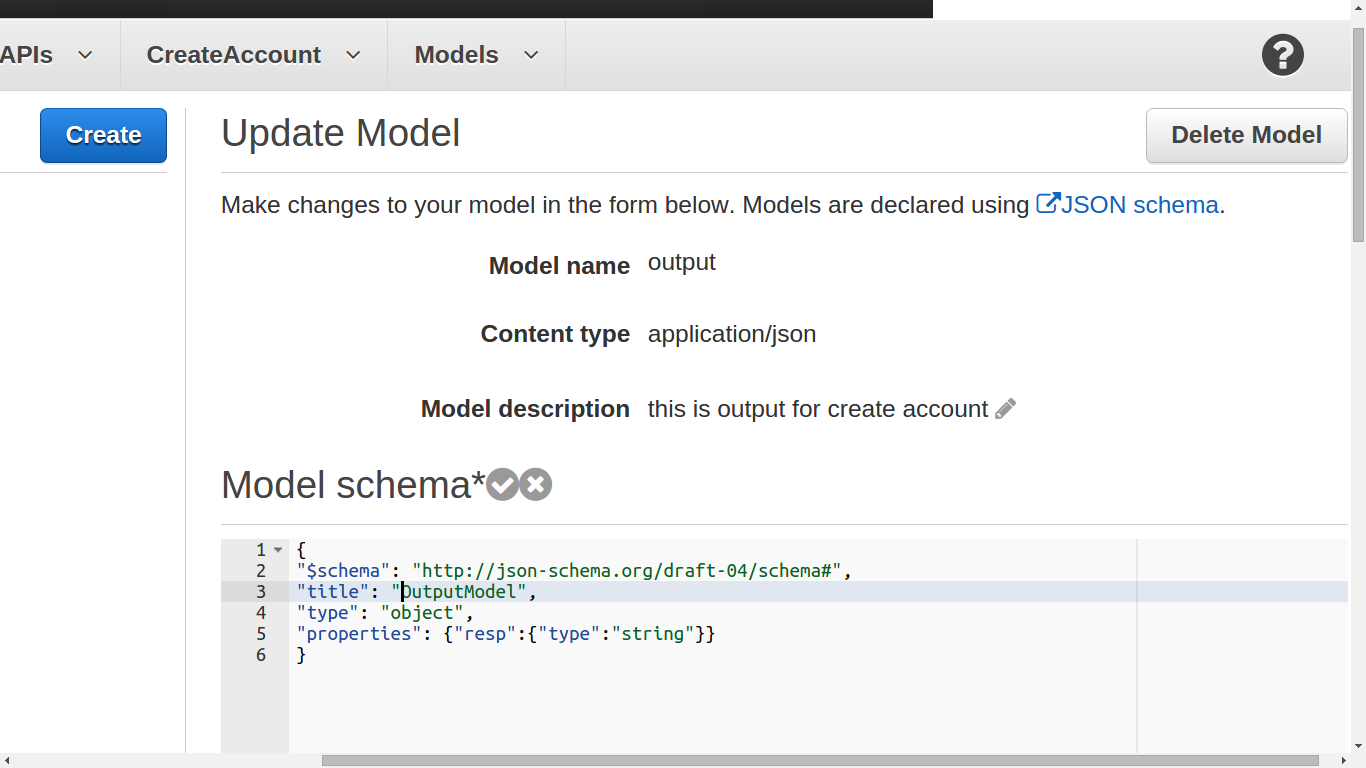
- Select Method Response section and add a response model add Content-Type as text/html and create an output model.
- Enter the output model format in the text field. Example code is given below
     {
        "$schema": "http://json-schema.org/draft-04/schema#",
        "title": "OutputModel",
        "type": "object",
        "properties": {
                        "resp":{"type":"string"}
                      }
     }
- Do the same steps for the other two functions UpdateStatus and getAllStatus . The only difference is that there is an additional parameter required for the UpdateStatus , ie status . So we should add name,password and status in the URL Query String parameter field of Method Request section. And create a request model and name it as Input then add the input model as the following datas. the only difference from the previous API configuration(CreateAccount) is the presence of status parameter.
      {
       "$schema": "http://json-schema.org/draft-04/schema#",
       "title": "updateStatus",
       "type": "object",
       "properties": {
                       "name": { "type": "string" },
                       "password":{"type":"string"},
                       "status":{"type":"string"}
                     }
      }
Add the following template datas in the Integration Request section.
      {
       "name": "$input.params('name')",
       "password":"$input.params('password')",
       "status" : "$input.params('status')"
      }
The getAllStatus API configuration is same as that of CreateAccount function.
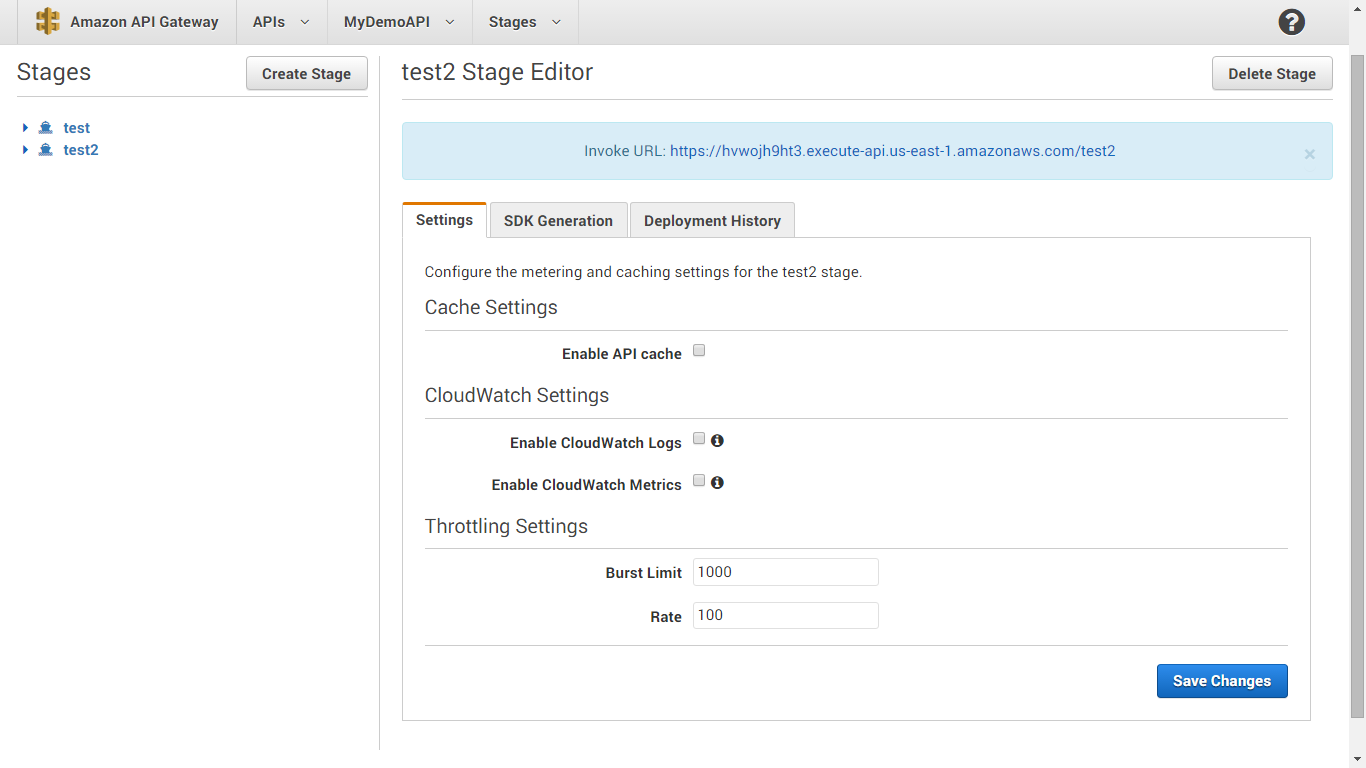
Now the models and mapping templates are ready to use. Next step is deploying the API. There is a button called Deploy APIclick on it. Select a deployment stage and deploy the API . Then you can configure Cache settings, CloudWatch settings and Throttling settings. Invoke url will be displayed on the top of the screen.
- Now the models and mapping templates are ready to use. Next step is deploying the API. Select a deployment stage and deploy it . Then you can configure Cache settings, CloudWatch settings and Throttling settings. Invoke url will be displayed on the top of the screen.
- Note down the invoke url. we will send the request to this url from our application.
STEP 2 : CREATE WEB INTERFACE AND UPLOAD IT TO AMAZON S3
- Everything is ready, now we can invoke the lambda function from a browser by sending the parameter with the invoke url. The sample application interface is located in following link
- https://s3.amazonaws.com/lambdapackage/LambdaAppFinal/index.html . the code is available herehttps://github.com/Nethram/LambdaDemoApplication/blob/master/index.html
- Create the application interface. you can refer the given html markups. In index.html file we have given action url of our API endpoint. Replace it with your invoke URL.
- So the next step is to upload the application interface file to the aws S3. Amazon S3 ( Simple Storage Service ) is an online file storage and web service. The is an button named as Create Bucket. Click on it . The following window will appear.
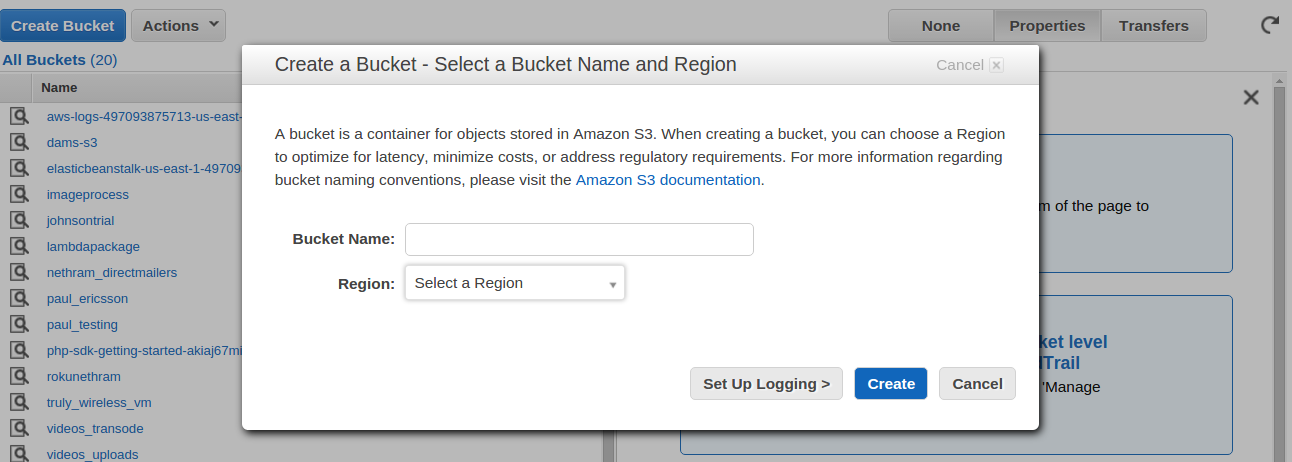 From the AWS console select S3 from the Storage and Content Delivery section.
- Give a name to it (example: lambdaApp) and select a region. Then press create button. Then on the next screen there is an option to upload files to S3. then upload the html file to it.
- After completing the upload. write click on the file and select Properties. Then a window will load on the right side of the page. Select Permission tab from the window. And select the Open/Download checkbox in the section where grantee name is set as everyone . Save the changes.
- Now the page is publically accessible. go to the page and check the functionalities of Your first Lambda Application.
- The lambda function updates the DynamoDB and RDS and it will return a HTML page to the browser.
Your scalable and reliable Lambda application is now ready to use.
AWS Lambda Tutorial: Step by step instructions to create a scalable web application – Part 3
Arunbalan

Create and configure Lambda functions and uploading Lambda application packages to AWS
Step 1: Create And Configure the Lambda function.
Sign in to the AWS console and select the Lambda . Then follow the instructions to create a lambda function. This session shows the steps to create first lambda function- CreateAccount for our application . Follow same steps to create two more functions, that are UpdateStatus andgetAllStatus.
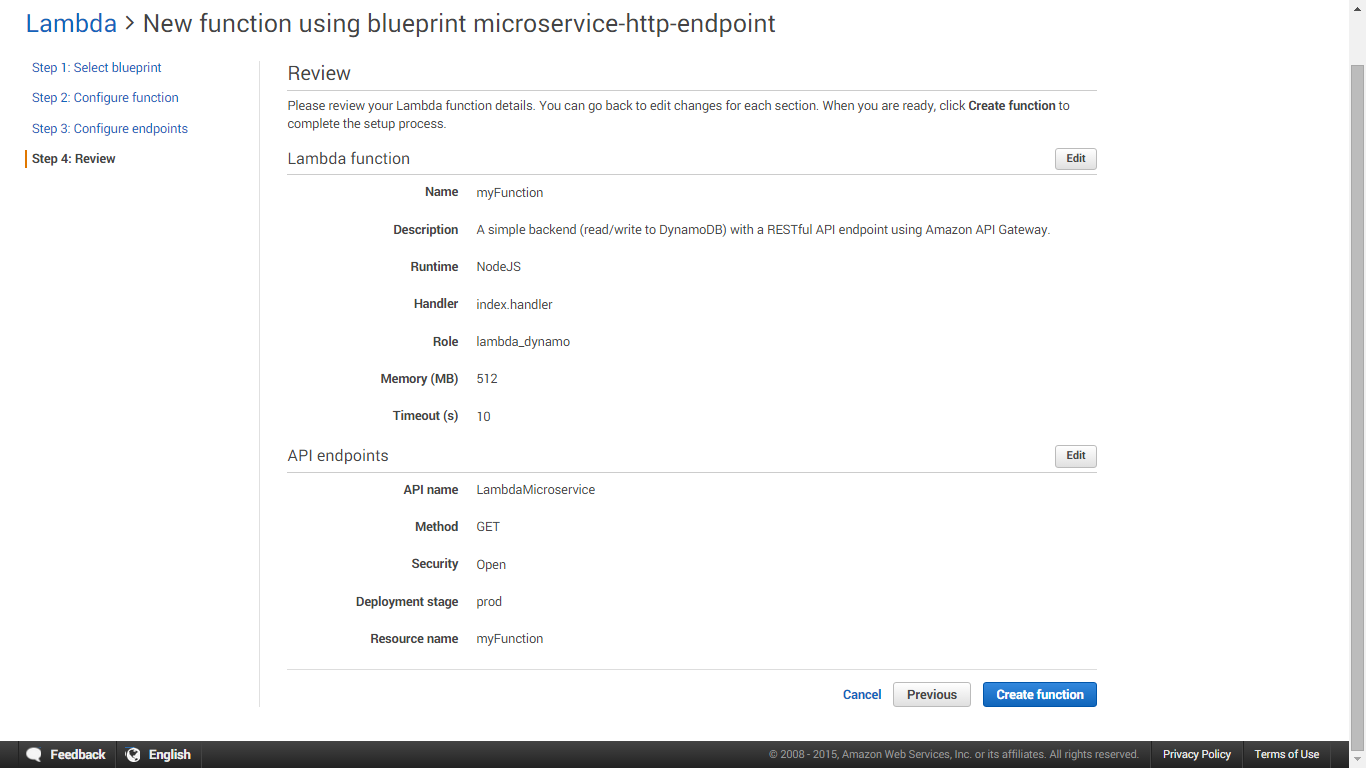
- Click on Create A Lambda Function button.
- Select blueprint, choose the microservice-http-endpoint blueprint
- Configure function, specify the following values:
- Enter a function name (for example, CreateAccount ).
- Select Node.js from the Runtime list.
- For the IAM Role , create a role by choosing the Basic with DynamoDB from the list.
This role template has a predefined access policy that grants sufficient permissions for AWS actions that your Lambda function needs.If you need more access permissions for your needs you can create a new IAM role and assign a name (for example, lambda_dynamo ) as the execution role. Here we use the predefined template Basic with DynamoDB. Press Allow button then click Next.
- In Configure endpoints , specify the following values:
- Give a name to the new API . Here we used the same name of the lambda function (CreateAccount ). After the API is created, it will appear in the Amazon Gateway console.
- Leave the Resource name as it appears in the console. It maps to the name that you specified for your Lambda function, so do not change this value.Here also we gave the same name of the lambda function( CreateAccount ).
- Choose a method from the list. Here we have chosen GET method.
- Leave the default prod for Deployment stage .
- Choose Open from the Security list.
Note: Make sure you have selected the Open from the Security list. Because we create this function for invoke it from web browsers without authentication process.
You will get a following screen make sure your configurations and click Create function .
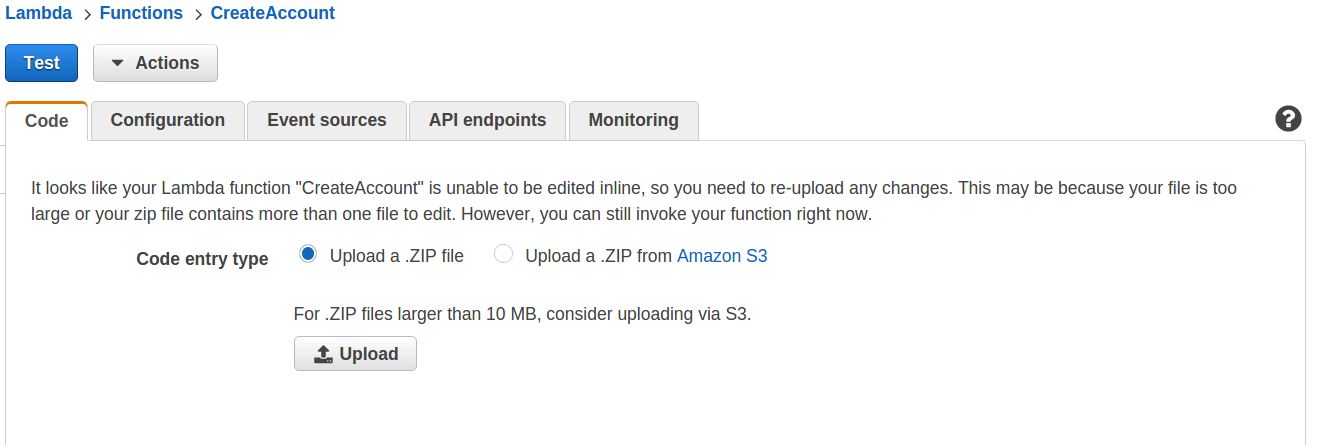
Step 2: Creating and Uploading the Lambda Application packages.
There are various options to deploy lambda function to aws. First one , we can use the editor available in Lambda console. and the second option is uploading a lambda package from our local machine to aws as a zip package. Final option is using lambda package stored in the amazon S3. In this scenario , we use the second method , that is directly uploading our lambda package from local machine to AWS lambda. It is because we are using MySQL database in RDS for this application. For that we need to include additional MySQL module to our package. we can’t do this in the editor available in Lambda console.
A:Create a Lambda function deployment package
- Create a folder ( LamdaApp ) in your local machine and create three sub-folders inside it. You may give those names as CreateAccount , UpdateStatus and GetStatus Respectively. After creating the folders install necessary dependency packages to all these three folders.
- You need to install Node.js platform.
- Install the Node.js platform. For more information, go to the Node.js website at http://nodejs.org/.
- Install dependencies in each folder. First enter in the first folder named CreateAccount and install those required modules.
- For MySQL module type this in terminal.
sudo npm install mysql
- For File System module type this line in terminal.
sudo npm install fs
- This will create a directory called node_modules and install the modules inside it. The mysql module is entirely written in Node.js, and implements an async MySQL.
- Copy the node_modules folder and paste it to other two folders (UpdateStatus and GetStatus).
- Now we have 3 folders and their required dependency packages in them. Next step is to create lambda function.
B: Create lambda function and html contents.
Inside each folder create the node.js file and other required files for the execution of the functions such as files containing HTML contents
CreateAccount
- In CreateAccount Folder Create following files. Files contents are available in github . :https://github.com/Nethram/LambdaDemoApplication
- Add contents of the index.js as given in the github file.which contains the actions to be performed after getting required parameters.Modify the lines 26-30 and add credentials for your RDS DB instance that you have created earlier.. Add the name of DynamoDB table in line number 58.
- The successful.txt contains the HTML markups which is to be shown after successfully creating an user account.
- The unsuccessful.txt contains the HTML markup that will return after errors occurred.
UpdateStatus
- Inside the updateStatus folder Create following files.
- Add contents of the index.js as given in the github file.which contains the actions to be performed after getting required parameters such as username, password and status.Modify the lines 25-29 and add credentials for your RDS DB instance that you have created earlier. Add the name of DynamoDB table in line number 61
- The success.txt file contains the HTML markups which is to be shown after successful updating of users status.
- The incorrect.txt files contains the HTML content which will show after incorrect user password entry.
- The noexistuser.txt contains the HTML contents which show the given username is not created an account. index.js.
GetAllStatus.
- Inside the updateStatus folder Create following files.
- Add contents of the index.js as given in the file in github. this is the page which executes when we trigger the lambda.Modify the lines 26-30 and add credentials for your RDS DB instance that you have created earlier.Add the name of DynamoDB table in line number 71.
- The success.txt file contains HTML markups which is to be shown after successful authentication of user credentials. This contains the HTML format of returning every user’s status.
- The incorrect.txt file contains the HTML content which will show after incorrect user password entry.
- The noexistuser.txt contains the HTML contents which show the given username doesn’t hold an account.
C:Uploading the Lambda package
- Now we have everything ready inside the LambdaApp folder. The next step is to compress the contents of those three subfolders and make zip files. You need to make sure that you are compressing the contents of each folders and not the folder itself. Upload the zip files to the lambda console of each lambda function. See the image below, there is an option to directly upload your zip packages to it or you can upload the files to amazon S3 then configure the third option. Here we are directly uploading the application package to the lambda.
- Test the function by clicking the Action button and select Configure test event option. then on the next window configuring a sample event by giving the simple JSON body. See this image.
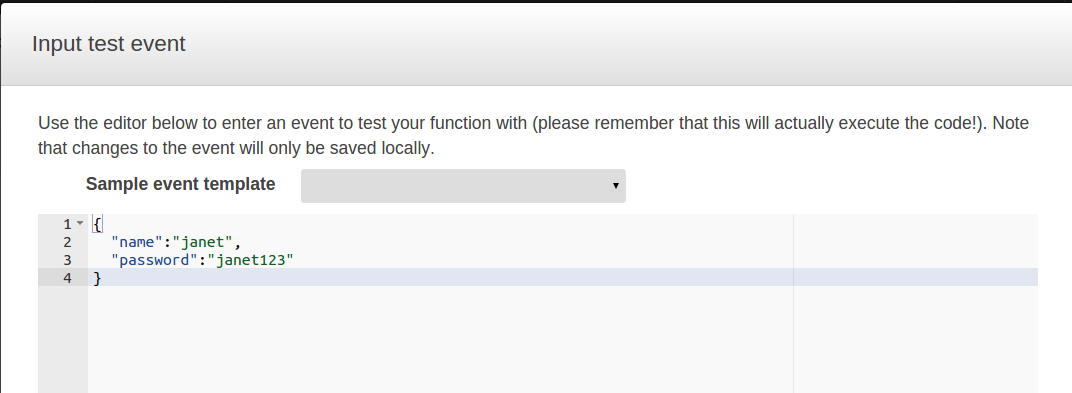
For example, after uploading the CreateAccount zip package we test the function by giving the parameters such as name and password. The JSON text event body is like this.
     {
      "name":"janet",
      "password":"janet1234"
     }
- Click on Save and Test button. Then the given parameters will be passed to the lambda function and it will execute,ie it will create an user account. The result will be shown in the console. The console will show error if there is any mistakes in your lambda function code.
- Check your database table and ensure the new item entry.
- Follow the same steps to upload and test other two lambda function packages. And use the test event body as follows. For UpdateStatus function. use this.
     {
        "name":"janet",
        "password":"janet1234",
        “status”: “This is my test status”
     }
make sure that your dynamoDB table has new entry after the test.
For getAllStatus function. use the test event shown in the first example.
We will cover the methods to configure API endpoint and upload application to AWS S3 in Part 4
AWS Lambda Tutorial: Step by step instructions to create a scalable web application – Part 2
Arunbalan
Nuts and Bolts
This application gives a complete overview of how to use AWS resource (such as DynamoDB and RDS) with Lambda and how to return an HTML page as a response to every incoming request. Here we are using Amazon RDS for storing user’s account information and Amazon DynamoDB for storing user’s status information. The web app is stored in Amazon S3. It is important to note that EC2 is not used. Hence there is no reserved infrastructure.
Note: There is no need to use both RDS and DynamoDB simultaneously. This example is using both to show that lambda can interface with both.
We will create 3 lambda functions and invoke these functions from separate API endpoints. The Lambda functions are
- CreateAccount : This function is used to create an account for the user by receiving username and password.
- UpdateStatus : This function receives username, password and status from the user. And update the status after authentication.
- GetAllStatus : This function authenticates users and list status of every user.
You are just few steps away from creating your Lambda application.
STEP 1: BEFORE YOU USE AWS LAMBDA FOR THE FIRST TIME, COMPLETE THE FOLLOWING TASKS:
- Go to the website https://aws.amazon.com/
- Sign up for AWS.
STEP 2: CREATE AMAZON RDS MYSQL AND DYNAMODB DATABASES.
a. Create and configure RDS MySQL database instance
- Go to the Amazon RDS console page. https://console.aws.amazon.com/rds/home .
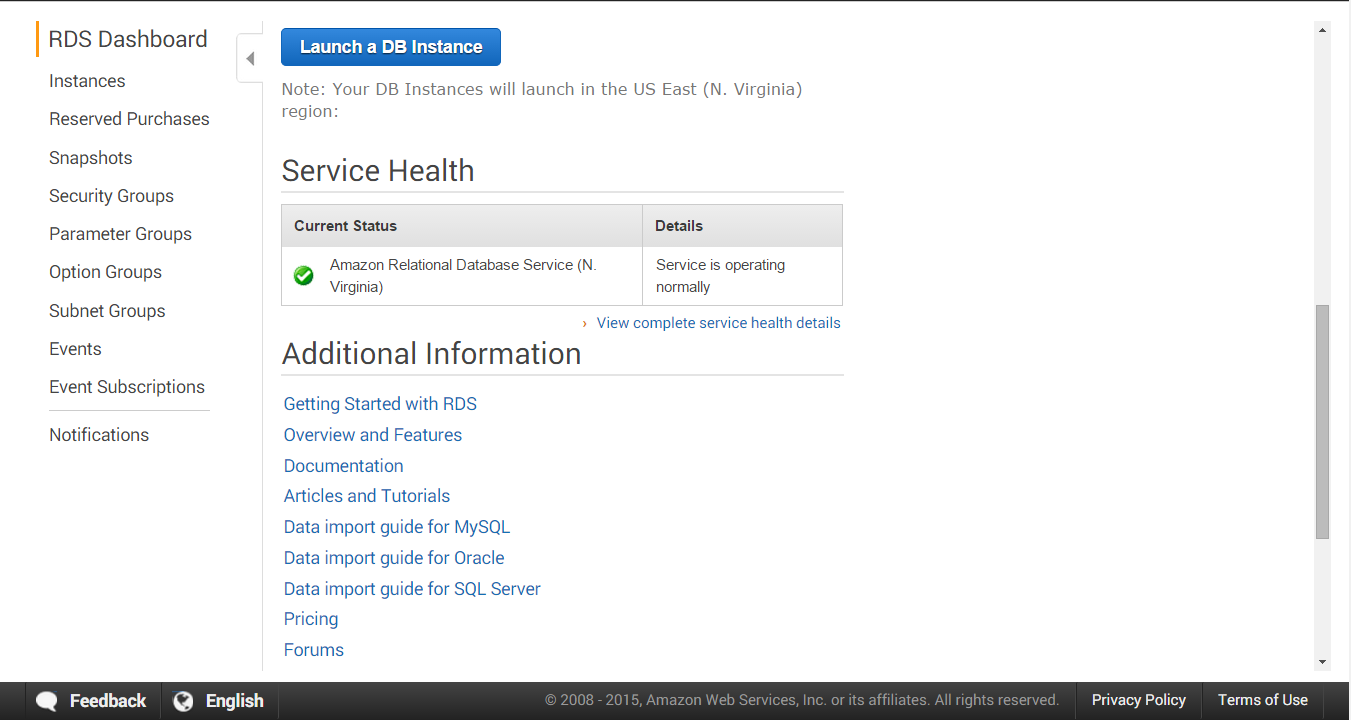
- Click on Launch a DB Instanceand Select MySQL database engine.
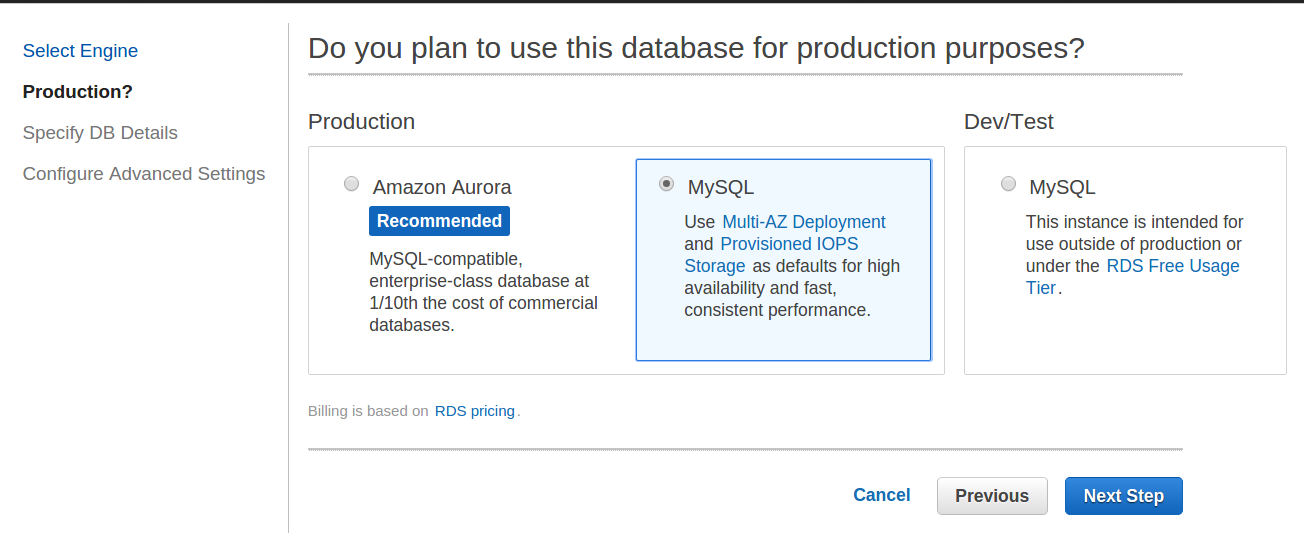
- In Production panel select Second Option MySOL – use Multi-AZ Deployment and Provisioned IOPS Storage as defaults for high availability and fast, consistent performance. Click next button.
- Specify database details in next step. Modify database instance class as you need. Here we select db.t2.micro and availing Multi-AZ Deployment. Under the settings give database name, username and password.
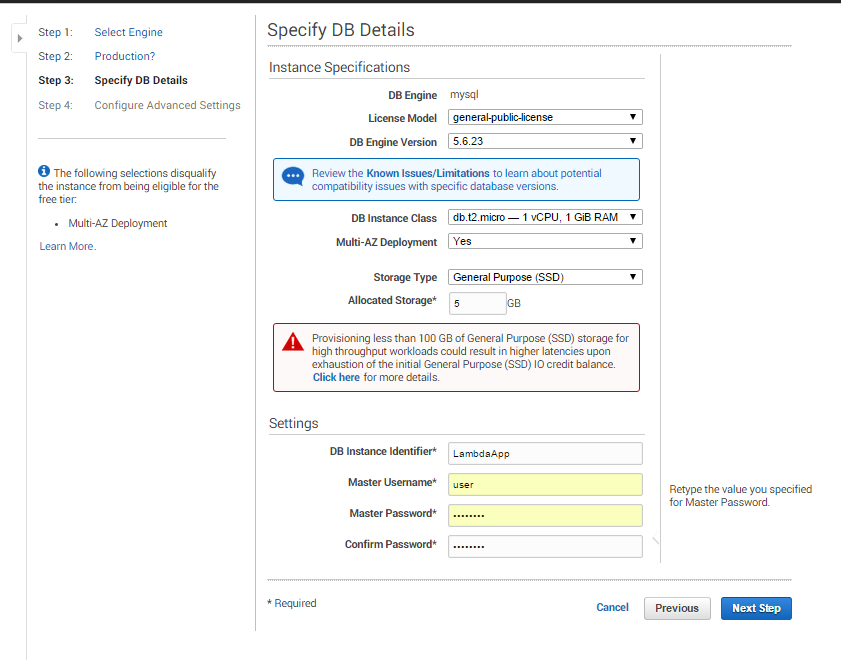
- Note down these RDS credentials,which are required to make DB connection from NodeJS script.
- Here comes an important configuration setup. In this page given below you should make the database publically accessible. And choose VPC and default VPC Security group. Then give a name to your database. Then click Launch DB Instance.

- Then your database will be created. You will get the endpoint address from the properties of that instance.
- Install mysql client and connect to this database using endpoint address, username and password. And add the schema given in our github. (in this demo application. We created a table named as ‘login’ and add three fields >UserId , name and password. UserId is auto incremented and name is the Primary key).
- Download the schema of RDS database available in github to your system. Open terminal and type commands as in following formate to import schema to RDS.
mysql -h RDSEndPointAddress -P 3306 -u username -p databasename < PathTORDSdatabaseSchema.sql
For example
mysql -h lambdaInstance.cukvxrgt8kqg.us-east-1.rds.amazonaws.com -P 3306 -u user -p lamdaApp < RDSdatabaseSchema.sql
Give password.It will configure your database.
b. Create DynamoDB Table.
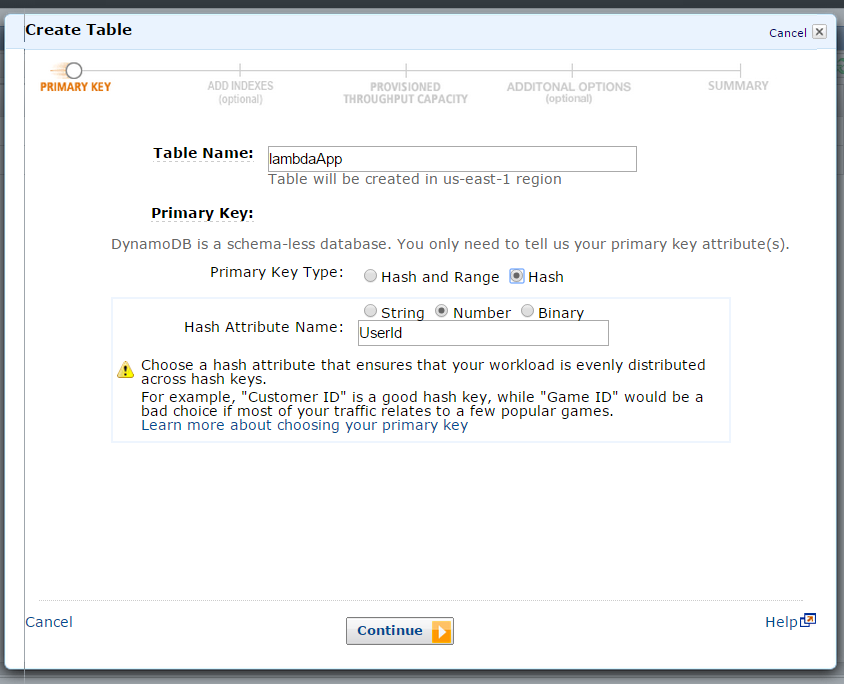
- Go to this link https://console.aws.amazon.com/dynamodb/home and select Create Table option. You will get the following screen. Choose a name for your table and Choose a primary key type. You can choose whatever name you like. For this application we created table lambdaApp. This table name is required to connect with DynamobDB from Nodejs script. So note down this table name. Here we are choosing hash for primary key and our hash attribute name is UserId. Then Click Continue.
- On the next page we have not configured the indexes . Leave this page as is.
- Next page you can configure the throughput capacity. This can be done according to the requirements.
- In the final page you can enable basic alarm for your table. Provide your email id to get the notification. Press Continue.
- Now you can review your table configuration and create the table. After some time the table will be in the active state. Then you can use the database from our lambda function by requesting with the table name and hash primary key.
- Click on the table name then it will open the table status. see the below image.
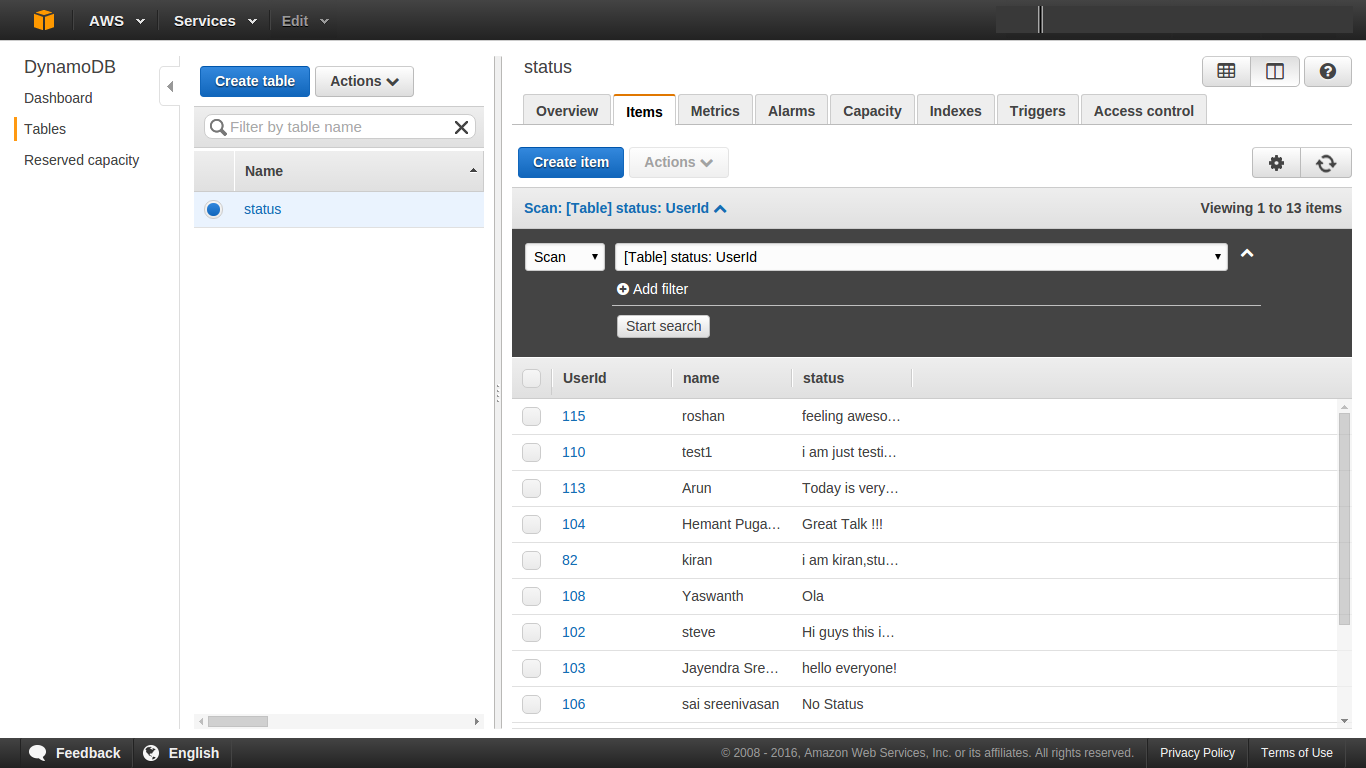
- Then go to the Item tab and press Create Item button. then following window will pop up.

- click on the plus( + ) button ,it will show three options, select the Append option then select String from the dropdown list.
- After this you can add the items. In this application we use 3 items. The UserId is already created. so add Name and Status to this table then save it.
We will cover the methods to create and deploy lambda applicatioin package in Part 3
AWS Lambda Tutorial: Step by step instructions to create a scalable web application – Part 1
Arunbalan

Building scalable systems is often unmanageable even with cloud computing. Normally we use Amazon AWS with EC2 , load balancer and autoscaling. This approach is inconvenient and sudden traffic spikes cannot be handled with autoscaling. Additionally some infrastructure should be always kept in reserve.
Aws Lambda can be used to solve these hassles of AWS load balancing. AWS Lambda is quite promising, easy to use and does not have the above limitations. The trick of using AWS Lambda with Amazon API gateway can help you build and scale web-applications with no infrastructure reservations.
AWS Lambda
AWS Lambda is a platform to make completely scalable applications with less effort and without the hassles of virtual machines. You need to upload your application code as “Lambda” functions to AWS. AWS Lambda runs your code on high-availability compute infrastructure and performs all the infrastructure functions, such as administration of the compute resources, capacity provisioning and automatic scaling. Those Lambda functions can be triggered by Amazon API endpoint, thereby exposing to the web. All you need to do is upload your code in one of the languages that AWS Lambda supports (currently Node.js or Java).
The Scenario
This document includes stepwise procedure for Building a completely scalable and reliable cloud based application using AWS Lambda.In this part we will see working example of scalabe lambda application.This involves creating a web Interface for app, construct AWS Lambda function, configure APIs in Amazon API Gateway and invoke the application from web browser.
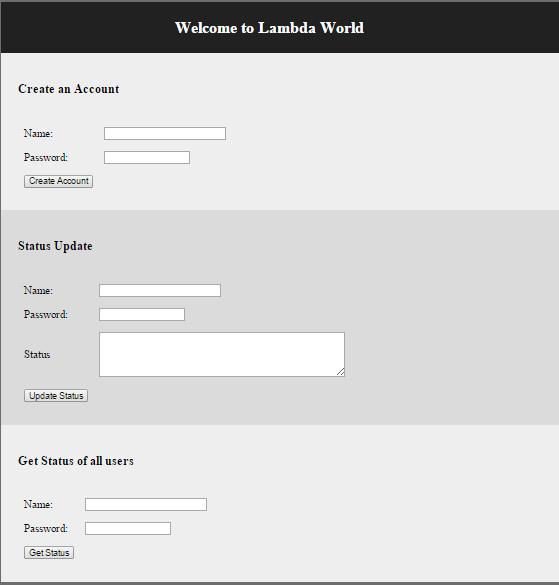
This demo application is a poor man’s facebook. The source code is available at github (https://github.com/Nethram/LambdaDemoApplication) It has 3 functionalities. Those are
- Creating user account with username and password.
- Update the user’s status.
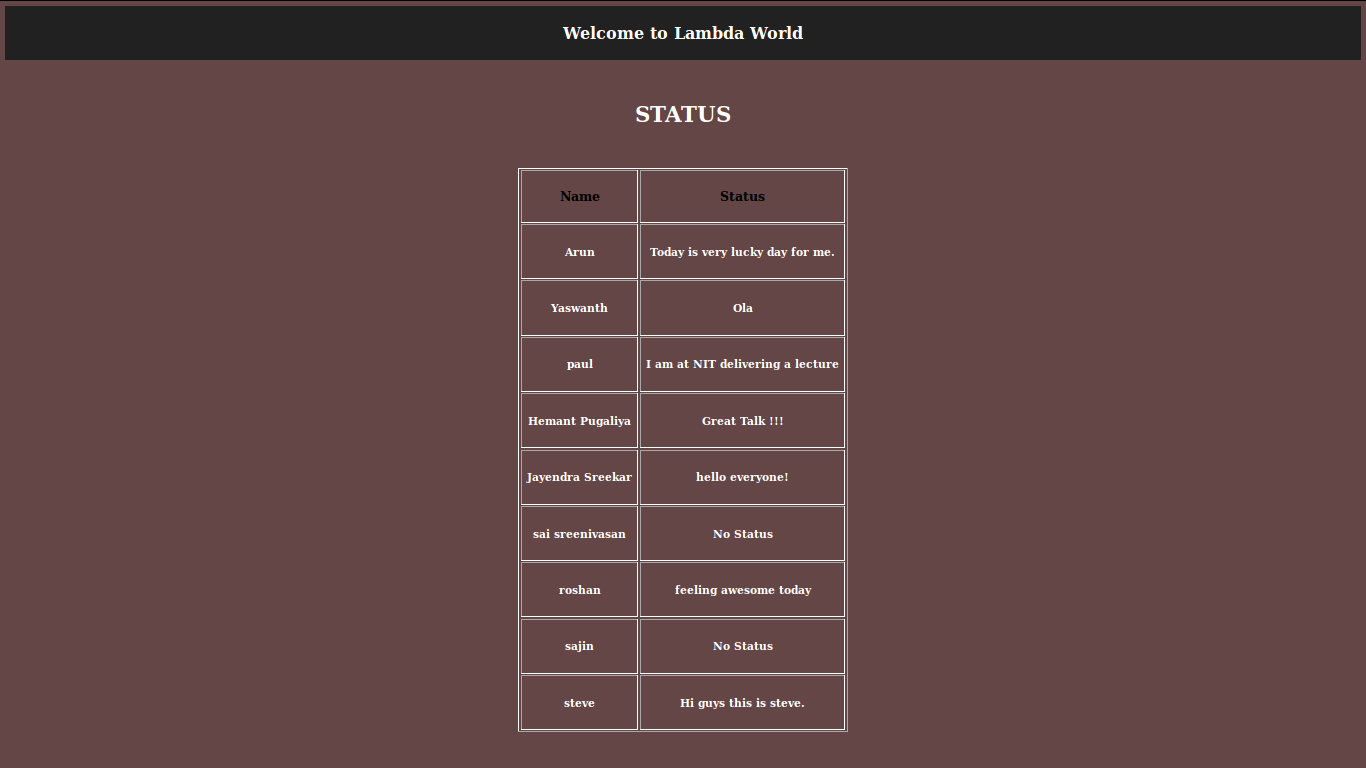
- View every user’s status.
Use this link to test this application. It opens the following interface.
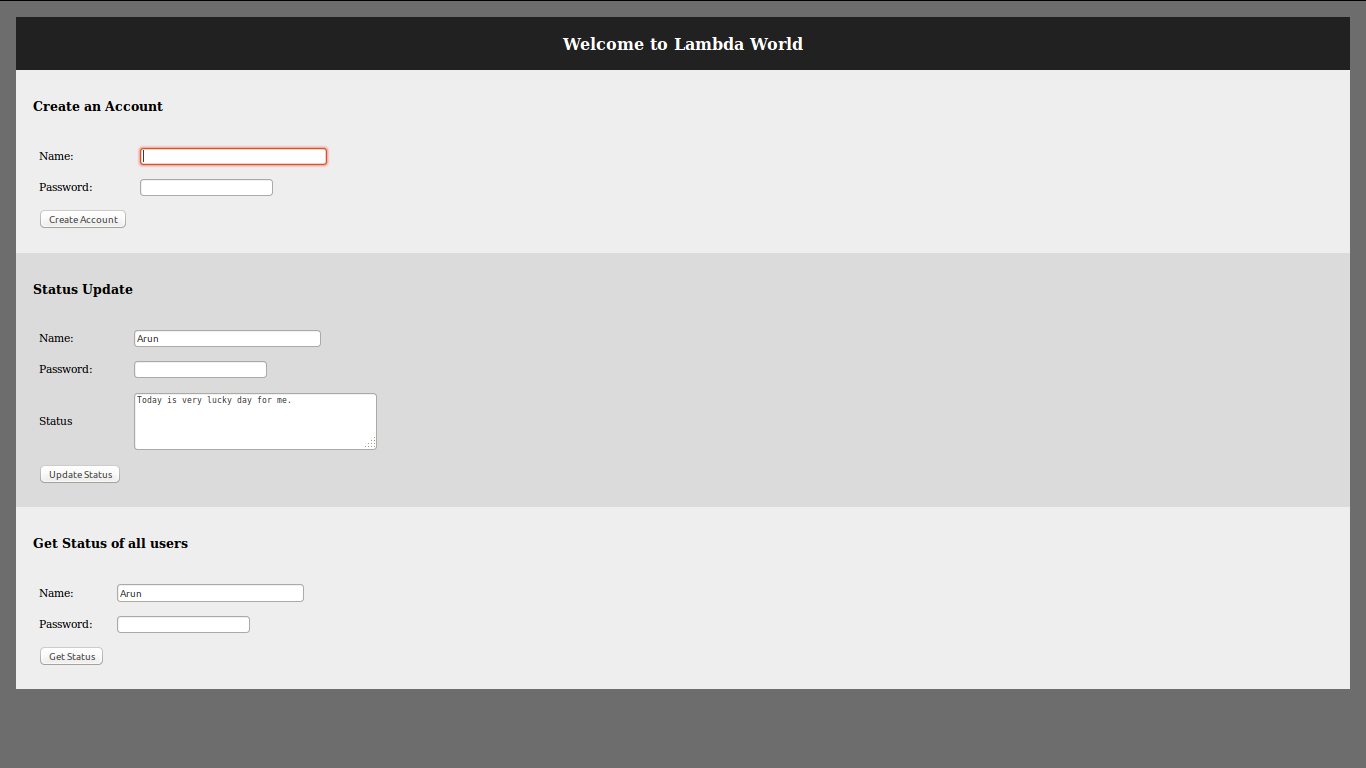
- Provide a username and password to create your account.
- Once an account is created, you may submit your username, password and your status in the second box.
- You can then see the status of every user by submitting your username and password.
Source Code :https://github.com/Nethram/LambdaDemoApplication.
We will cover the nuts and bolts of connecting AWS resources with Lambda in Part2
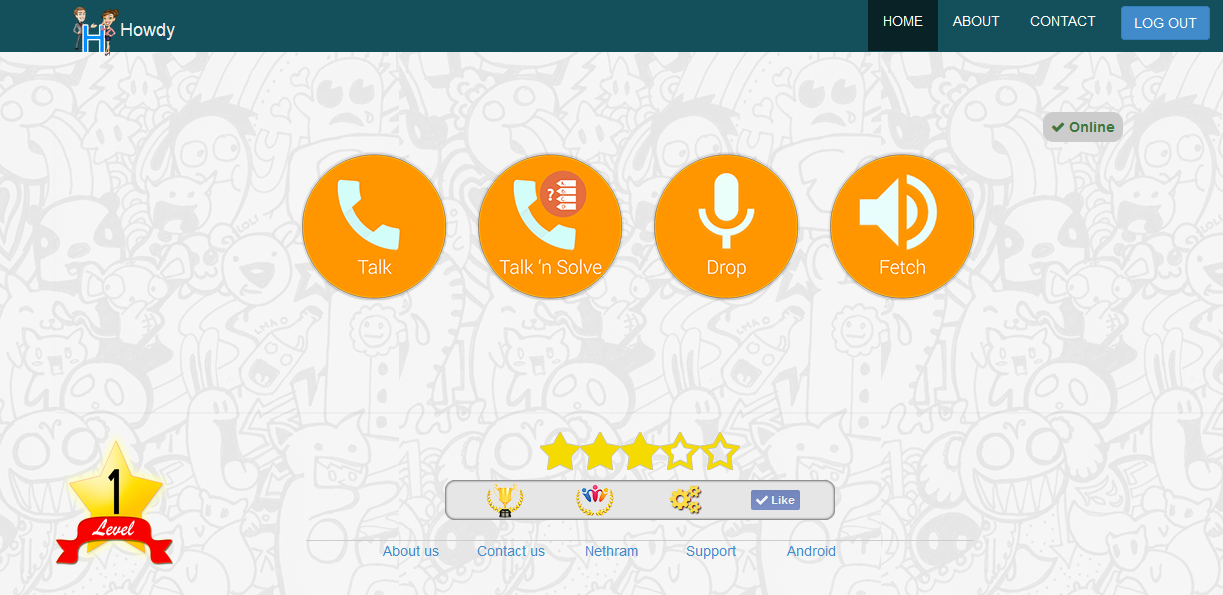
Howdy- Talk To Strangers is Now Online
Sibin John
May 15, 2015

About Howdy
Howdy is a voice application that encourages citizens of the world to talk with each other. A person anywhere on the globe can tap on his phone, connect with a random stranger somewhere else in the globe. They can speak with each other in order to jointly solve a puzzle, one that can only be cracked by collaborative discussion. It’s kind of like the world’s biggest game of pub trivia, or a global ice breaker. Howdy games are based on general knowledge, science, history and maths. Howdy is capable of entertaining and at the same time it can be a tool for improving and exchanging knowledge, make friends, have fun, unite the world and at the same time improve your communication skills, general awareness and knowledge base.
How to use
Howdy is a free app and is available at Google Play store. It is also available through web browser. The app is easy to use, once installed the user connects to the Howdy server. Hit the “Talk” button and they’re connected to a random person and have three minutes to make a connection and say whatever they’d like.
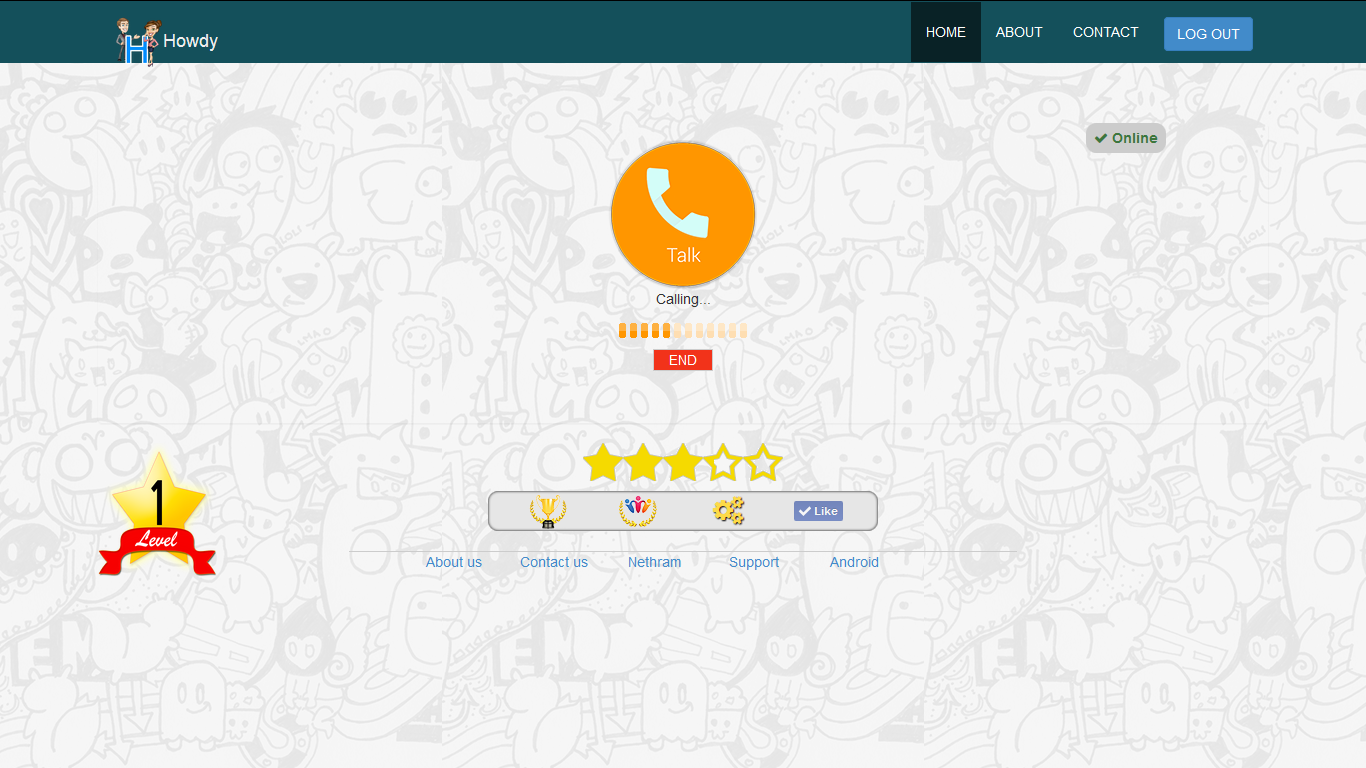
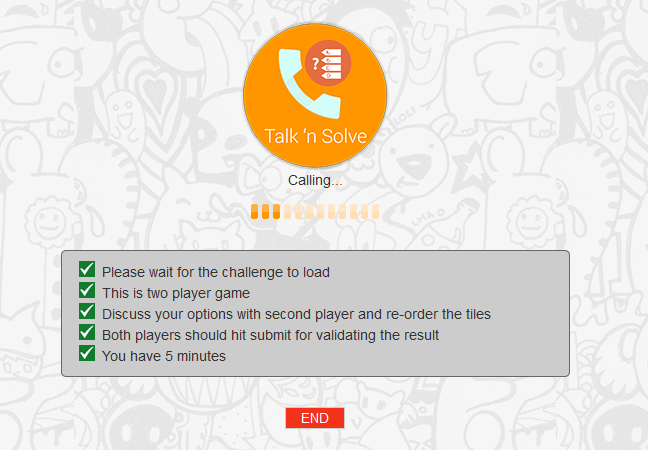
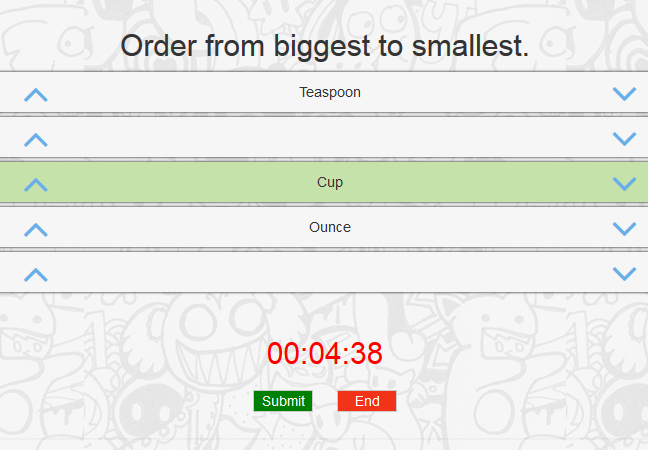
By hitting the “Talk ‘n’ Solve” button, they’re connected with a random person and the pair have five minutes to solve the puzzle which can only be done with verbal co-operation and communication.
Users also have an option of leaving a voice message for the rest of the Howdy users. Another Howdy user can retrieve this message by pressing the “Fetch” button, one message will be retrieved – like an electronic note in a bottle.

What makes Howdy interesting
Howdy! brings back the excitement of long distance communication. Once there was a time when talking to someone in another country was a novelty. Long distance telephone calls were expensive, but the excitement of talking to someone on the other side of the globe was thrilling. “What’s the weather like there?” “What are you eating for lunch?” Just simple questions about our shared daily routines helps to remind us that we’re all one human family.
Additional features and future scope
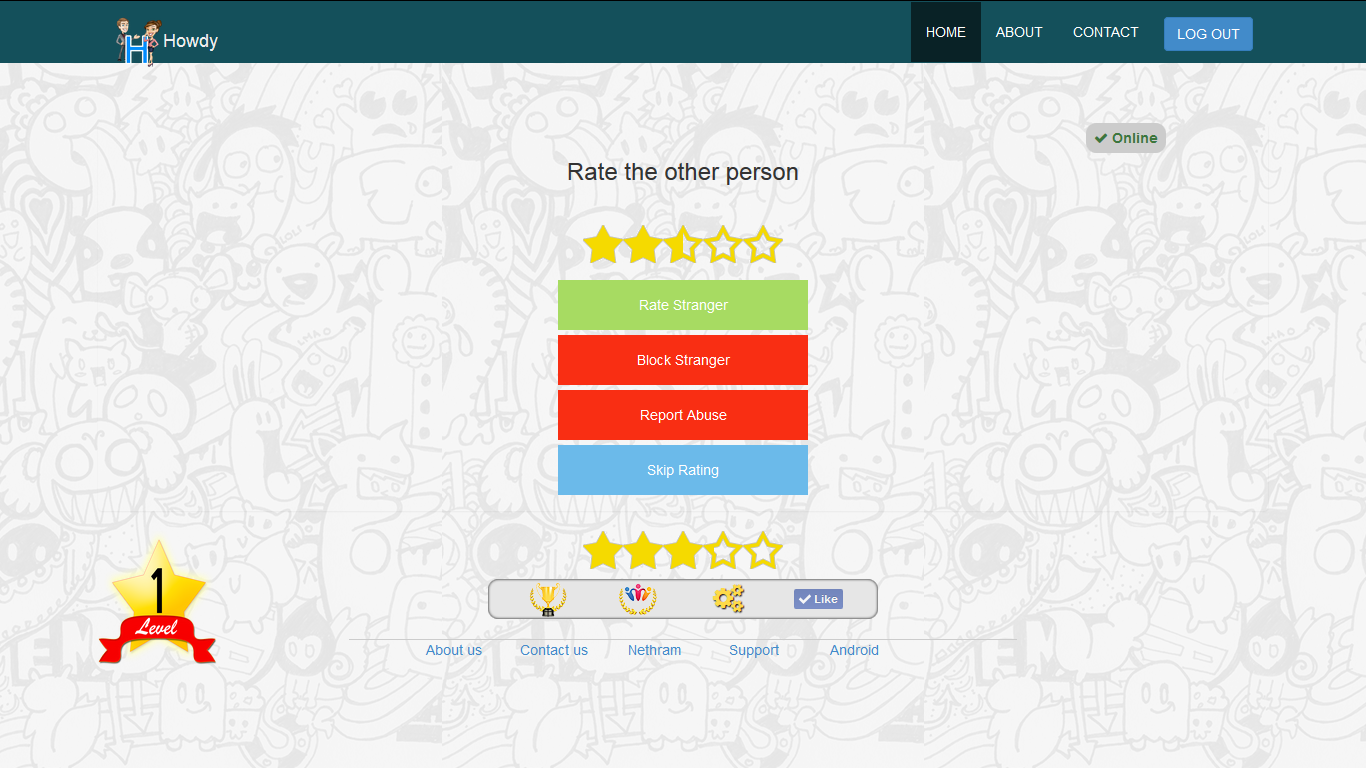
Security features for Howdy include the ability to block a person and an option to report abuse.
Howdy is built as a platform for building massively scalable web and app based voice applications. The platform can be re-used to build large voice applications such as google talk.
Howdy is available for Android at Google Play store and can be downloaded from https://play.google.com/store/apps/details?id=com.nethram.howdy
Howdy is also available through web browser at http://howdytheapp.com
Phonepay
ANOOP V M
March 31, 2015
PhonePay is a web based software tool which helps you to collect payments from your customers via phone calls. It provides an interactive voice response system with assigned Twilio phone number and payment is made through stripe.
Consider Mr. John Doe and his Pizza Hut where he is using PhonePay as a payment option. His customers give their orders through phone or some other means. They are advised to call his PhonePay number and pay the billed amount.
John Doe is able to verify their payments in PhonePay’s admin panel. If customer cancels order or if he wish to give some discount , he can refund the desired amount to the customer from admin panel. Also if the customer expands his order, shopkeeper is able to charge overage at any time by a single click.
Features
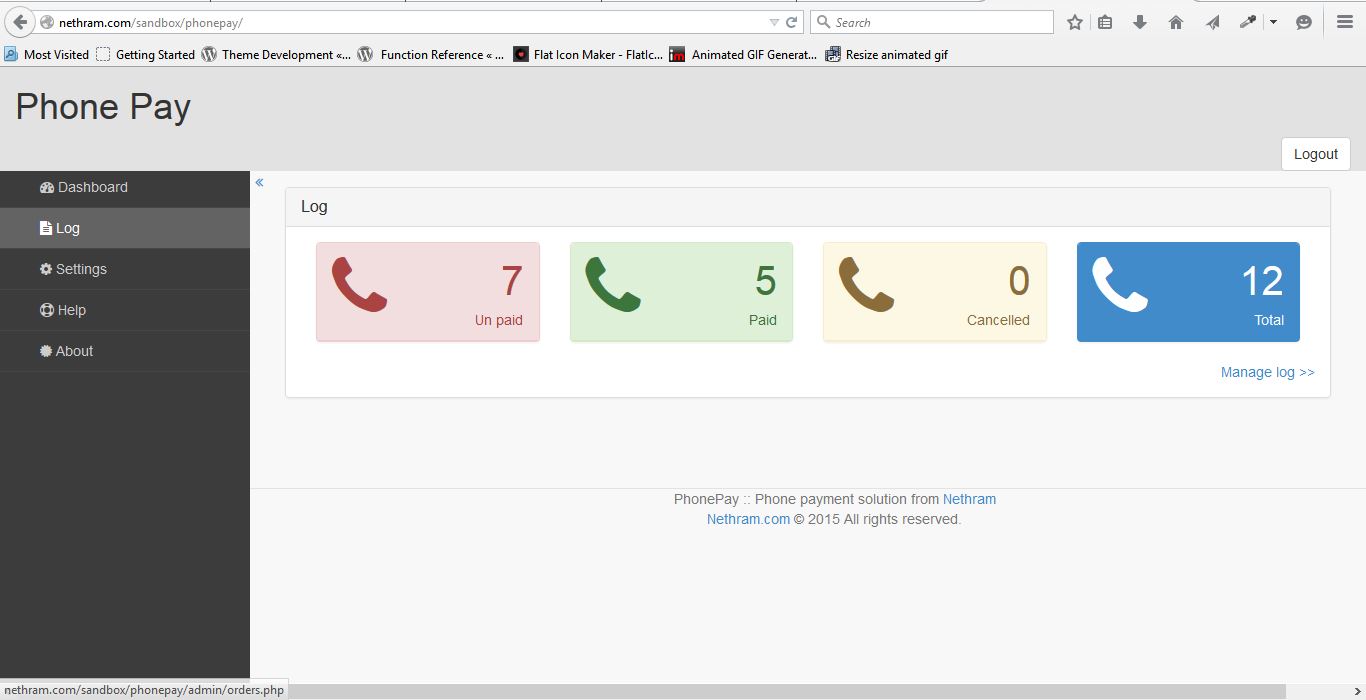
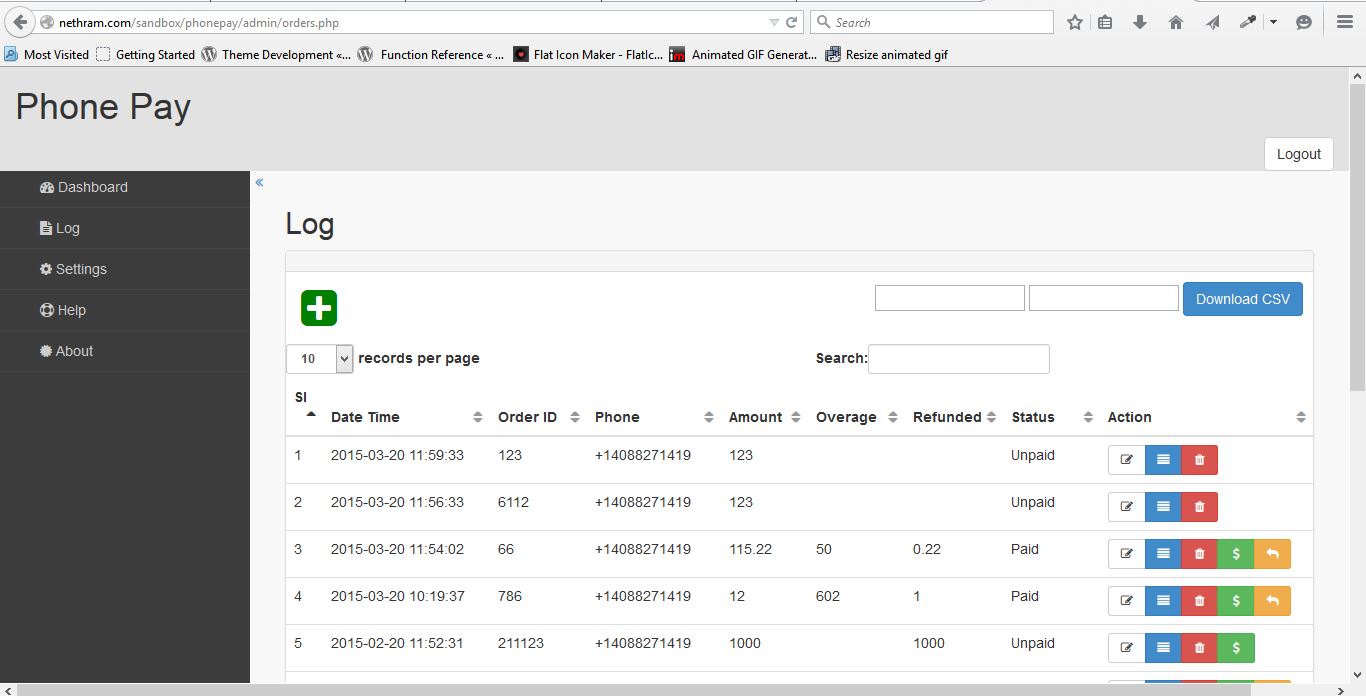
- Detailed call and transaction log.
- One click refund.
- One click overage charging.
- Configurable system behavior.
- Simple installation.
- Easy to use Admin Panel.
- Responsive design.
Prerequisite
A web server :
PhonePay run on PHP-MySql enabled web server.
Stripe Account:
You should have a working Stripe account to collect your payments.You can create a free account by registering at www.stripe.com.
Twilio Phone number:
Set up a working phone number at www.twilio.com. Your customers have to call this number while attempting to pay for your service
or product.
Get Started
It is easy to get started with phone pay. Get a copy of source file from www.github.com. Extract all files to your web server and open it in your favorite web browser. PhonePay’s installer GUI will help you in completing installation. During installation you will be asked to enter database credentials and Stripe keys.
After installation you have to enable your Twilio number by changing its Request URL. This is done from the the Twilio account at www.twilio.com. Request URL for PhonePay installed at www.myphonepay.com will be http://www.myphonepay.com/twiml.php.
Now you have a working PhonePay service. Make your first call to your PhonePay number, you will be answered by PhonePay’s IVR.
How it works
Users calling to your PhonePay’s number will be answered by its interactive voice response system (IVR) .The user will be lead to pay through Stripe. User will be prompted to enter credit card details by IVR. PhonePay does not store any credit card details on server. All call logs and payment details will be available in Admin Panel. Admin can manage orders and also if needed, refund the amount to the payer. If any customer updates his order, admin is able to charge overage by a single click in admin panel.
Phone Pay can be configured in four different modes called system behavior. System behavior is switchable based on your needs at any time from admin panel.The four system behaviors are as follows.
- Fixed Payment with Order IDAdmin fixes an amount for all payments. User will be asked to enter Order ID and then lead to pay the fixed amount. Also admin can create order with order ID and payable amount. User entering an existing order ID will be lead to pay corresponding amount.
- Fixed Payment without Order IDUser will be directly lead to pay a fixed amount that has set by admin. No Order ID will be asked.
- User defined Payment with Order IDUser will be asked to enter the amount they wish to pay after entering Order ID. Also admin can create order with order ID and payable amount. User entering an existing order ID will be lead to pay corresponding amount.
- User defined Payment without Order IDUser will be lead to pay the amount they wish to pay.
Set a system behavior best suited to your business and start selling with PhonePay. If you have any question or if need any support please write to us at support@nethram.com. Also you can explore and write at PhonePay’s support form for any questions at http://forum.nethram.com.
Screen shorts: